|
|
Aileron Construction
We finally are started on the ailerons. Christopher has launched into
working on them, even though we have a little work left to do on the
tanks (mainly checking for leaks, and setting a few rivets which had
to be ordered as we were a few short in attaching the Z-brackets!).
| Started Left Aileron |
June 21, 2004 |
|
Chris launched into the left aileron (with some small help from me). He
got the stiffeners cut out and tapered, though they still need to be
cleaned up with the Scotchbrite wheel.
Update: After I got done with work I went out and did the rough cleanup
of the stiffeners with the large Scotchbrite wheel. I still want to do
some more fine cleanup (and did get about 1/3 of them done) using the
small/soft Scotchbrite with the die grinder.
Time : 2.0 hours |
| Deburred Stiffeners / Preped for Drilling |
June 22, 2004 |
|
Chris wanted me to get things ready to drill (since he is not crazy
about using either the bench grinder or the die grinder) the stiffeners.
I finished using the small/soft Scotchbrite wheel on the remaining
stiffeners. I figured out which way was "up" on the aileron
spar, and removed the plastic from the inside of the skin. I got a piece
of plywood for drilling, and all is set to go. I'll update this entry if
he finds time to make progress today. This is the nice way to use the
last half-hour of one's lunch break. :)
Update: Chris did get back to working on the aileron and got all the
stiffeners drilled to the skins, labeled with their position, and the
stiffeners and skin holes deburred. Good progress.
Time : 1.75 hours |
| Left Aileron Dimpling / Stiffener Priming |
June 23, 2004 |
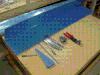
We marked the stiffeners with the electric scribe so we could Scotchbrite
them for priming. After lunch Chris dimpled the stiffeners and then pulled
the plastic off the outside of the skins. We then primed the stiffeners
and he dimpled the skins. We are ready to rivet the stiffeners now! In
fact, Chris already taped the rivets in place and all we need to do is
fire up the rivet gun to get the job done.
Time : 1.75 hours |
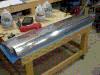
| Left Aileron Stiffeners Riveted |
June 29, 2004 |
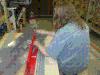
The weekend was consumed finishing up the tanks, and today we are back to
the ailerons. Chris and I back-riveted the stiffeners in place during my
lunch break. This went great, and the aileron looks super! We both were
running out of time so we stopped with getting ready to bend the aileron
trailing edge ... but will do the actual bending later.
Time : 1.25 hours |
| Left Aileron Reinforcements Drilled |
July 2, 2004 |
We took a little time at lunch to debur the left aileron spar, debur (and
shape a little) the A-408 reinforcement plates, and the Chris drilled them
to the spar.
Time : 0.5 hours |
| Left Aileron Reinforcements Riveted |
July 3, 2004 |
Well, as it turns out I oriented the A-408 incorrectly. We had to toss
them out, fabricate some new ones from some .040 I had, and redo the work
of drilling them again. We got that done, primed the parts, and riveted
them to the spar. I deburred the nose ribs and put center-lines down the
flanges. I also spent some time trial-fitting the parts forward of the
spar together to make sure I understood how it all goes together. I would
have done more ... but party-prep (mainly a major shopping excursion)
took up more time than expected.
Time : 1.5 hours |
| Left Aileron Drilled |
July 4, 2004 |
|
Christopher and I had a quite successful and productive day today. We
drilled the nose ribs to the spar and the forward skin. We also drilled
the forward skin to the spar. The nose ribs were primed and dimpled and
riveted in place. The counterweight (water pipe) was drilled and riveted
as well.
After that we drilled the main skin to the rear ribs and the spar. All of
those parts were disassembled and deburred. All we need to do now is dimple,
prime the main ribs, and rivet. Maybe tomorrow, as today we have folks
coming to visit.
Oh, and we also got in our first shots using "e;live ammo"e; in
the potato gun (meaning, we went to the park and shot potatoes!). It worked
great, and we got about 100 yards on our best shot. However, we need
bigger potato's, as the ones we are using don't fill up the whole diameter
of the barrel and I know we are loosing some energy in blow-by.
Time : 4.0 hours |
| Left Aileron Counterweight Drilled / Top Skin Dimpled |
July 6, 2004 |
I had a little time to kill while a slow process ran, and dimpled the
top left aileron skin. I also drilled and countersunk the the water pipe
counterweight. One more session of dimpling and we are ready to rivet.
Time : 0.75 hours |
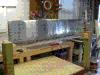
| Left Aileron Ready to Rivet |
July 18, 2004 |
|
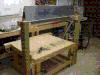
I finished dimpling the nose skin, and the spar. The aileron is now ready
to rivet. I probably went overboard, but rigged up a "riveting
jig" to hold the aileron while we riveted. It is slightly awkward to
get into the spar as the lower skin has to be pulled away from the structure
to make room for the bucking bar (not to mention your hand) so I didn't
want the aileron moving around as we pulled, tugged, and hammered on it.
I want to finish this today, but am feeling very under the weather.
I think a cold is coming on. If these lines stay in the log, you can assume
I got nothing more done today. Oh well.
Time : 1.25 hours |
| Right Aileron Stiffeners / Left Aileron Riveted |
July 23, 2004 |
|
Before dinner tonight I started trimming on the stiffeners for the right
aileron. I've not closed up the left aileron yet, but am just waiting for
time when I have a helper to drive/buck those top spar rivets. Once those
are done, closing the rest is trivial.
After dinner we did drive the top rivets along the left aileron spar. I
also set the rivets on the nose ribs, and the top of the end ribs. I even
remembered to squirt in some blue RTV to buffer the stiffener ends at
the trailing edge of the aileron. All that is left now is to close up
the underside of the aileron and mount the hinge hardware. Almost done!
Time : 3.25 hours |
| Left Aileron Finished / Right Aileron Under Way |
July 24, 2004 |
|
I spent the morning finishing up the left aileron. I had mistakenly drilled
and dimpled the lower spar rivet line for 3/32 rivets, when the CS4-4
rivets called for really need a #30 rather than #40 hole. So, in tight
quarters, I drilled out the holes and eased my pneumatic squeezer in the
gap and re-dimpled the holes larger. It was tight, but worked out fine.
The other mistake I made (though not a bad one) was in not preparing for
the bolts adequately. I should have drilled the holes for the AN3 bolts
earlier (while the spar was wide open) and should have opened up the end
rib a little more. I had not realized that the flange as well as the web
needed to be removed! Oh well, lessons learned for the next aileron (which
I am going to go work on right now.
I finished the final deburring of the stiffeners, and pulled out all
the rest of the parts for the right aileron. I pulled off all the plastic
and deburred the spar. Other commitments caused me to have to stop at
that point ... but it is my hope to make major headway on the aileron
tomorrow.
Time : 3.5 hours |
| Drilling Right Aileron Stiffeners |
July 25, 2004 |
|
I had little time this morning because we have to head out to a farewell
brunch for some friends moving to Austin, TX, but I did get a little
work done. I drilled one side's worth of stiffeners to the right aileron.
After the farewell brunch (and a few other distractions) I did get a bit
more work done. I got the rest of the stiffeners drilled to the skin. All
the stiffeners were marked (electric scribe) and dimpled. I also did most
of the dimpling on the skin for the stiffeners before having to call it
quits for the day.
Time : 2.5 hours |
| Drilled Spar Reinf Plate / More on Stiffeners |
July 26, 2004 |
I scotchbrited the stiffeners, and primed them. I drilled the aileron
spar reinforcement plates to the spar, deburred, scotchbrited them, and
primed them as well. I'm now ready to start assembly of both the spar
and back-riveting the stiffeners to the skin.
Time : 1.0 hours |
| Riveted Stiffeners / Reinforcement Plates |
July 27, 2004 |
|
I took 15 minutes at lunch and Kat helped me finish dimpling the skin. Getting
to those few holes near the trailing edge really takes more than two hands!
After that I got Chris ready and he did most of the back-riveting of the
stiffeners to the skins. I gave a hand on those last two rivets on each
stiffener near the trailing edge ... just holding the skin out of the way so
Chris could rivet (since he was already in the riveting groove). Great help
from the kid!
After work tonight I riveted the spar reinforcement plates to the spar,
drilled the nose ribs to the spar, deburred and riveted the nose ribs in
place, and started to drill the countersink (water pipe). I also (with Marie's
help) bent the trailing edge of the aileron skin. Would have done more but
had to knock off for the night to work on some long overdue financial tasks.
Time : 2.5 hours |
| Drilled Aileron |
July 28, 2004 |
|
Tonight I attached the counterweight to the nose ribs, drilled all the ribs,
match-drilled the skins to the spar, drilled and countersunk the leading
edge rivet holes on the counterweight, deburred the ribs, and deburred the
leading edge skin. I only stopped because my little handy-dandy deburring
tool's battery ran down. (Yes, I could have reverted to manual measures,
but to top it off I was pooped and decided it was a good point to quit and
go take a shower. *whew*)
Another night like that will see the aileron mostly assembled! The second
one sure goes faster ... as long as you don't screw anything up. :)
Time : 2.0 hours |
| Re-worked Nose Ribs |
August 5, 2004 |
|
Ok, I didn't exactly screw anything up .. but I was not really happy with
the alignment of the nose ribs. I knew I could do better, and ordered a
new pair and started work. We did take a break to have a family vacation
up to Philadelphia, which was great fun! But it did make for a break in
the airplane-construction work. :)
I deburred the new ribs, and clecoed them in place on the spar, counterweight,
and nose skin. I had little time to spend tonight so that is where I left
it all ... ready to drill.
Time : 1.25 hours |
| Drilled/Deburred/Dimpled Nose Skin |
August 7, 2004 |
I drilled, deburred, and dimpled the aileron nose skin, ribs, and spar. Once
the main skin is ready, it'll be time to rivet.
Time : 2.75 hours |
| Finished Right Aileron |
August 8, 2004 |
|
I deburred the main skin, and then dimpled the skin and the main ribs. I
put my "riveting stand" back up. I clecoed the aileron together
and am now ready to rivet.
After lunch I riveted the top line of rivets along the spar with Theresa's
help, then closed up the rest of the aileron. I forgot to put the RTV at
the back of the stiffeners until I had pulled 3 blind rivets, and had to
drill them back out! Fortunately, they came out with zero trouble.
Once closed up I installed the hinge brackets, and torqued the bolts. This
means the ailerons are DONE! Cool. :) Now I just need to store them some
place safe until it is time to hang them on the wings (and I have a plan,
if it works out).
Time : 5.5 hours |
Total Time : 39.50 hours
|
|
![[ The Frye RV-7 Project ]](images/frye_project_banner.png)