|
|
Elevator Construction
The elevators should come right after the rudder construction, but the
rudder is delayed a bit. Spin testing of the factory prototype RV-7
caused Van to realize that the spin characteristics were not quite what
he would have wanted. Not unsafe, mind you, but not up to his standards.
After testing a larger rudder (basically an RV-9A rudder) the decision
was made to ship all RV-7(A) builders a replacement rudder kit.
One benefit of building as slow as I build is that I had barely started
on the rudder ... so am just going to put the old rudder parts into
storage, and will wait for the new kit to arrive before I worry about
the rudder at all. Therefore, I'm off to build elevators now!
| Started on Right Elevator |
June 5 2002 |
I started work on the right elevator today. I have very little time but
was determined to do SOMETHING today. I got the right skin and spar
out of storage, hung the elevator plan sheet where it would be handy,
and then drilled the skin to the spar. Not a lot done, but better than
nothing! This is going to be a hectic week (a party on Saturday and we
are still preping/painting/upgrading the master bathroom) ... but afterward
I intend to get into high gear on the elevator construction.
Time : 0.5 hours |
| Painting Delays |
June 17 2002 |
|
It has been a frustrating June, with house painting (and various other
activities and incidents) keeping me from getting any work done on the
elevator. However, we really want to get the painting done before
we have a new bed delivered. One the upside, I have spent a little time
getting the garage rearranged so I can create more bench and storage
space. In the long run, that'll be a positive move for the project!
|
| Laying out Stiffeners |
June 25 2002 |
The family insisted that I work on the airplane, if only to cause me to
be a bit less grumpy. The bedroom/bathroom remodeling work isn't done,
but the garage is rearranged to give me more room to work. I started the
stiffener layout (finally!) and hope to get this done quickly. Even with
the insistence that I work ... I could only carve out an hour tonight. We
had other "family emergencies" to deal with, but I intend to get back into
full tilt construction this week.
Time : 1.0 hours |
| Trimming/Tapering Stiffeners |
July 3, 2002 |
My son and I trimmed and tapered the stiffeners. They are ready for rivet
layout, and drilling to the skins. We were about to do the layout when our
dinner guests arrived, stopping work.
Time : 2.0 hours |
| Drilled Stiffeners/Skins |
July 5, 2002 |
My son and I finished the layout of the rivet holes on the stiffeners, drilled
the holes on the stiffeners, and then drilled the stiffeners to the skins. We
deburred, dimpled, and primed the stiffeners. We also started dimpling the
skins when a thunderstorm halted work.
Time : 4.0 hours |
| Dimpling / V-Jig Installed |
July 6, 2002 |
Various things kept the available time low today, but we did finish
dimpling the skins and installing the v-jig for the elevators. We also
spent some time practicing back-riveting, and that went superbly. Tomorrow
we rivet!
Time : 2.0 hours |
| More Right Elevator Work |
July 7, 2002 |
We riveted the stiffeners to the skins, assembled the spar doublers and
associated nutplates, and assembled the tip ribs which hold the counterweights.
The back-riveting on the skins went without a hitch. Chris and I traded off
doing stiffeners. Each would do a line of rivets and then the other would do
the next line.
Time : 3.5 hours |
| Finished Right Elevator Skeleton |
July 14, 2002 |
|
We got quite a lot done today, even though at times it seemed like progress
was slow. First came the "bending brake" and the bending of the
elevator trailing edge. It took some squeezing, but we got it bent. We then
continued work on the skeleton eventually finding that we needed to trim
the inboard tip rib so it would clear the spar flange. This sent me on a
quest to find a nibbler, which was eventually found at our local Harbor
Freight store. With that trimmed and cleaned up, we riveted the tip ribs to
the spar with little trouble.
Next came fitting the control horn to the skeleton. That went with little
trouble as well, care being taken to center the tube of the control horn
on the line made by the rod end bearings down the spar.
Finally, the skeleton was slipped into the skins and everything was drilled
to match. At this point we just need to fit the counterweight skin,
debur, dimple, and rivet.
Time : 4.5 hours |
| Finished Right Elevator Skeleton |
July 19, 2002 |
We drilled the counterweight skin to the skeleton and elevator skins,
deburred everything, and then dimpled. We are ready to put the RTV
at the trailing edge (inside the skins at the stiffener ends), cleco
it all together, and then rivet! After that we start on the left
elevator ... and I think we'll do the trim tab first, because if we
screw it up, new parts can be on the way while we work on the parts
we do know how to do!
Time : 2.0 hours |
| Riveted Right Elevator |
July 21, 2002 |
Today the skins got riveted to the skeleton. It went great and I was
even able to get those last two trailing edge tip rivets with my no-hole
yoke. Wonderful. Once again, the pneumatic squeezer was a real blessing.
Once the leading edge is finished, the elevator is done!
Time : 4.0 hours |
| Finished Right Elevator |
August 2, 2002 |
We finished curling the leading edge, drilled, deburred, and riveted. The
right elevator is finished! We would have been done earlier but for having
attended Oshkosh 2002. (See the entry in the "General" section for
a quick rundown of our trip!) We were hot to get this finished tonight
as we are now about to head for a week vacation at the beach, and we
badly wanted to finish this elevator. We start on the left when
we get back.
Time : 1.5 hours |
| Started Left Elevator |
August 12,14, 2002 |
Back from vacation at the beach, and back to working on the plane. We
got started on the left elevator by deburring the edges of the skin and
spars, drilling the spars to the skins, and laying out the placement lines
for the stiffeners. A little shop cleanup time had to be factored in as
well (not reflected in the number of hours on this entry, 'cause it isn't
really working-on-the-plane time) since things were in a bit of a
disarray from right elevator work, and pulling stuff out for the beach
trip!
Time : 2.5 hours |
| Finished Stiffeners, Drilled to Skin |
August 15, 2002 |
I finished drilling, deburring, and priming the stiffeners. We then
drilled the set to the top skin, but the heat/humidity caused us to call
it an early night and we left the bottom half for later. I did have one
"oops" however. I thought I was positioned right for drilling
one of the holes to the skin, but I was just off of the hole.
Oops. I thought about re-drilling in the right spot and then having
to cover/fill the offending hole later, and felt that it was too close
for comfort. I left the hole, and there is going to be one rivet which
is not perfectly in line. Bummer. And it had to be on the top skin too,
of course. Right?
Time : 2.0 hours |
| Mis-Drilled Skin! |
August 16, 2002 |
|
I started on finishing the drilling of the stiffeners to the skin, and
made a tragic mistake. I grabbed the wrong stiffener, not realizing, and
drilled it to the wrong position. The mistake was severe enough (and when
combined with the other mis-drilling above) I decided to replace the
skin. Damn.
Aside from the obvious not-paying-close-enough-attention stupidity in
evidence here, I think there is a critical issue at play which caused
these mistakes. Complacency. I built the right elevator with NO problems
at all ... and in doing so became complacent in building the left. A
(somewhat expensive) lesson learned. On the up-side, I'll get to start
fresh on the left elevator and do it right, and will at the same
time re-work the stiffeners to correct a rivet hole spacing issue that
I was unhappy with.
Still, it sucks to make a mistake and screw up parts. Truly sucks.
Time : 0.5 hours |
| Started on New Skin |
August 27, 2002 |
After some delay (waiting for the parts to come in, etc.) I have the
new skin in and started work on it. I drilled the spars to the skin
and laid out the stiffener positions. I'll use the "short"
stiffeners I already have and will re-fabricate the other full length
stiffeners.
Time : 1.0 hours |
| Fabricated Stiffeners (again) |
August 28, 2002 |
Tonight I had a member of the EAA-1114 chapter (Greg Hunter) come out
to see what is involved in building. We fabricated the stiffeners and
then took some (a lot) of time double-checking and thinking through
the positioning of them on the skin. After much discussion we drew
lines, and then realized that we hadn't taken the stiffener orientation
into account. Why is the left elevator being so much more trouble than
the right was?? :) At that point it was late, and we called it a night
'cause building when tired makes for problems. We have labor day weekend
coming up ... and while that SHOULD be a great opportunity to build, we
have one final room to paint and that is going to consume a lot of our
time. We'll see if I can build while paint dries!
Time : 2.0 hours |
| Drilled Stiffeners to Skin (first side) |
August 31, 2002 |
I re-did/re-checked the layout of the stiffeners (in the morning, well
rested with no distractions) and got it spot on. I drilled the stiffeners
on the first side of the elevator. The remainder of the day was consumed
with other activities, so no more work got done on the airplane.
Time : 1.0 hours |
| Drilled Remaining Stiffeners / Deburred / E-615 Prep |
September 1, 2002 |
Even with room painting prep work going on, I got a lot done on the
airplane today. I finished drilling the stiffeners to the skin, deburred
and dimpled the stiffeners, then primed them. I also primed the E-615
and the electric trim servo motor cover, dimpled the parts, and riveted
the platenuts to the E-615 plate. I also started dimpling the skins and
ran out of time.
Time : 4.0 hours |
| Dimpled Skin/ Riveted Stiffeners / Bent Trailing Edge |
September 2, 2002 |
The title above says it all, really. The stiffeners (and the E-615 plate)
are all riveted on, and the skin trailing edge is bent. We move on to
assembling the skeleton now. We also had a visitor today ... Chuck Hall,
a about-to-begin RV-8 builder. We had a nice chat talking about tools and
various airplane-building-things with it likely that he'll be ordering
tools and kit within the next few weeks.
Time : 3.5 hours |
| Left Elevator Spar Reinforcement Plates |
September 10, 2002 |
I had very little time (in a week of very little time) tonight to work
on the plane. Still, I did get the spar reinforcement plates preped and
the first rivet on the first plate driven. :) No, it isn't much, but
a little is better than nothing!
Time : 0.5 hours |
| Riveted LE Spar Reinforcement Plates |
September 12, 2002 |
I'm starting a new practice (or attempting to, at least!). I'm going to
get up a little earlier in the mornings on weekdays and try to put in
an hour of work every day on the plane. Today I didn't get in quite an
hour, but did get all the rivets driven on the spar reinforcement plates!
Time : 0.75 hours |
| Left Elevator Skeleton Work |
September 13, 2002 |
I didn't get as much done today as I had hoped ... since some things came
up that took me away from the shop. However, I did get the skeleton parts
deburred, the end rib (E-609?) flanges bent, and the front and rear spars
drilled to the E-609. I also did the countersinking on the top of the
rear spar to accommodate the dimples in the skin. This is so I didn't have
to either dimple or countersink the trim tab hinge.
Time : 3.0 hours |
| More Left Elevator Skeleton Work |
October 27, 2002 |
After a long break (see reasons on my main logbook page) I'm back to working.
I had only a little time today, but got the E-603 and E-604 riveted together.
I also drilled the tip ribs to the spar. Skeleton assembly is next on the
list! (And, hopefully, I'm back in the building saddle again and will be
making more progress than I did over the last month of non-work!)
Time : 1.5 hours |
| Left Elevator Skeleton Completed and Drilled |
November 3, 2002 |
Christopher and I (with my new "Main Squeeze" from Cleavland)
quickly put the left elevator skeleton together tonight. (We got little
time to work on things today because of a -very- late party last night!) We
also put in in the v-jig with the skeleton, clecoed it all together,
clamped on the counterweight skin, and did final drilling of the skin to
the skeleton. At that point it was time to call it a night .... the whole
family is still recovering from the party!
Time : 2.0 hours |
| Left Elevator Deburring |
November 4, 2002 |
I tried to get a start on a new routine today. With my new group in the
company being on the west coast, I'm trying to shift my hours up a bit
to accommodate. This gives me time in the morning ... a time when I really
enjoy building anyway. I'm trying to get on up-and-out and into the
garage to get some work done. It'll take a while to create a routine,
but today I got in 3/4 of an hour and did all the deburring from all the
drilling we did last night. Christopher came out while waiting for his
school carpool and helped with the deburring a bit too. Next ... we drill
and attach the control horn weldment. After that, it is on to bending
the dreaded tabs on the skin! :)
Time : 0.75 hours |
| Control Horn Attached |
November 5, 2002 |
|
First ... it is Christopher's birthday! He turned 15 today, so clearly I
need to get moving on finishing this airplane. :) Day number two of the
new routine is working well, as I did get up and spent an hour on building
before I sat down to work.
Today my task was to position, drill, debur, and rivet the control horn
onto the left elevator skeleton. That was completed, and the new "Main
Squeeze" rivet squeezer worked like a dream. I think I'm really going
to like this new tool! Tomorrow, I bend tabs on the elevator skin. Wish me
luck.
Time : 1.0 hours |
| Trim Servo Mounting |
November 7, 2002 |
|
Well, I thought the next thing to do was to bend the tabs, and I was
close. Upon looking back at the directions they really suggest mounting
the trim tab servo motor now while access to the inside of the elevator
is good. They have a point. :) So, I started working on that today.
Since I have not really looked at that assembly yet I spent a little
head-scratching time. I looked at the plans, fiddled with the parts,
and went to look at some other builder's web pages to confirm that,
yes, you do have to trim the z-brackets a bit. I could see no other
choice, but it is comforting to see that other builders came to the same
conclusion. Cut lines are marked, and the hole for the servo control
wires is drilled. With that, I'm outta time and have to go to work.
Time : 0.5 hours |
| Finish Trim Servo Mounting |
November 10, 2002 |
I finally got the trim servo mounted. The brackets needed a good bit
of trimming, and I had my share of frustrations getting it done. It
is a tight fit and clamping everything together to get the holes
drilled took some work ... but it is done now and I'm fairly pleased
with the results. Next we bend the tabs on the elevator skin! (FINALLY!)
Time : 2.5 hours |
| Ready to Close |
November 17, 2002 |
|
After a work-week-from-hell where I got no airplane work done, I did
get the tabs bent. I tried using the wedge taken from the elevator jig
pieces ... but had trouble using it. Given how I was trying to clamp
it all together I couldn't get enough "grip" and the trailing
edge section kept slipping. After much swearing I gave up on that wedge
and quickly cut me one out of a 2x4. This was more than twice as wide
and when clamped in place had a lot more surface area which made it less
likely to slip when I went to bend. My bends are not beautiful,
but they are perfectly serviceable. This took a LOT more time than
it ever should have!
I then dimpled everything else that needed to be dimpled to be ready to
close up the control surface. I dimpled the skins and the skeleton, and
used the "pop rivet dimple die" to dimple those holes inboard
of the bent tabs. It worked like a champ. Next we squeeze a bunch of
rivets, and build the trim tab to finish things up on the left elevator.
Time : 4.25 hours |
| Riveted Skin to Skeleton (almost) |
November 18, 2002 |
|
Christopher and I started closing the elevator. We started by riveting
the two "impossible to reach" rivets which are just inside
the spar and tip ribs before we put the skeleton in place. We test fit
the skeleton and discovered that a flange on the trim servo reinforcement
plate did hit some rivets which were holding on the control horn
weldment. We did a little trimming (which the manual warned might be
needed) and then were ready to put it all together.
Just before we put the skeleton in for the last time Christopher
remembered that we needed to put the "blue goo" at the trailing
edge of the stiffeners! A few quick dabs of goo, and we were ready to
rivet. We started on the spar and got most all done and then had to
break for dinner. Our time was up, but another good hour of riveting
will see the main portion of the left elevator riveted. All we have
left after that is the trim tab!
Time : 1.5 hours |
| Riveted Skin to Skeleton (more) |
November 19, 2002 |
|
I spent a little time before work today doing more riveting. This will
be all I can get done myself today and we have a little left to go, but
slowly (as always with my building!) but surely we'll get it finished.
Tonight Christopher had some time so while I had to go run other errands
he worked on some more riveting. If he had been sure about which side of
the trim tab section to rivet, he would have gotten it all finished! As
it is, there is a small handful of rivets left to be driven. Maybe tomorrow!
Time : 1.25 hours |
| Tiny Bit of Riveting |
November 20, 2002 |
|
I had no time to work, but Christopher finished up all the solid rivets
needed on the elevator (except for the top of the trim tab spar, which
has to wait for us to fit the hinge). We now just need to curl the leading
edge and put in a few pop rivets both there and on the trim tab spar and
bent tabs. Slowly slowly, bit by bit ....
By the way, it is great (and amazing) that I now have a helper that can do
stuff unsupervised. Christopher is getting to the point where he can get
independent work done ... and do a high quality job, too! Wow! How cool!
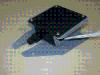
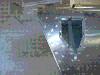
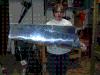
The picture shows the left elevator with all the solid rivets driven and
ready for the CS4-4 rivets to go at the far end of the trim tab spar. The
clecos in the top you see are there waiting for the trim tab hinge to be
fit and riveted on.
Time : 0.25 hours |
| Pop Rivets Installed |
November 21, 2002 |
I had just a few minutes again in a busy day to install a few
rivets. I installed a grand total of 5 rivets. Amazing. These were the
CS4-4 rivets which go on the bottom. I'm leaving all of the top rivets
until I install the trim tab hinge, so all I have left to do is to
curl the leading edge. I hope to do that tonight, and then we
can essentially call the left elevator done. At least this counts toward
the "touch the project every day" school of thought. :)
Time : 0.25 hours |
| Left Elevator Finished |
November 24, 2002 |
|
I wasn't sure we would actually get around to putting in any work on the
airplane today, but really hoped we could. The question had to do with
whether I survived putting in the paving stones beside the driveway or
not. The paving stones are sort of an airplane-related activity because
they are needed due to me taking over the garage and forcing us to park
all our vehicles in the driveway!
We finished curling the leading edge and installing all the needed pop
rivets. I'm considering the left elevator to be done, with the trim tab
being a related but individual part. Therefore, this is a completion
milestone! :)
Time : 1.5 hours |
| Trim Tab Started |
November 28, 2002 |
We started work on the trim tab. The skins were drilled to the spar (and
deburred) and the spar bottom holes were dimpled. We machine countersunk
the top holes on the spare to accept the dimples from the skin, and so
we would not have to dimple and/or countersink the hinge.
Time : 1.5 hours |
| Trim Tab Bottom Finished |
November 29, 2002 |
|
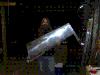
We got the (#**%*$#*@*%*%) tabs on the ends bent, and the bottom side of
the trim tab riveted to the spar. And, yes, bending the tabs was a pain
until we figured out a way to get a good bend line. However, now the rivets
are in and the control horn is on. Close to the end now!
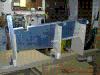
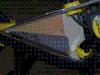
The swearing you see above is all about the tabs on the ends of the skin. I
know that they say to use the wedges from the elevator jig, but I could not
clamp them in place well enough to avoid them sliding as bending force was
applied to the tabs on the skin. It would slide inward, and my bend would
slide along with it. I caught this before it ruined the skin, thankfully.
(And, yes, I had the same problems on the elevator tabs too.)
Eventually I cut a larger wedge, which worked ok on the elevator but was
still inadequate for the trim tab. Finally I took a piece of aluminum bar
stock and used it for the edge to bend over, and used my wedge to hold it
in place. Once that was done I could bend the tabs with firm taps from a
plastic-headed hammer. This gave me nice straight bends right where I
wanted them. A picture of my setup is included here.
Time : 2.5 hours |
| Trim Tab Attached / Elevator Finished! |
December 1, 2002 |
|
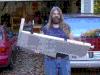
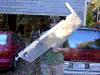
As planned (I love it when plans work out) I spent the afternoon working on
finishing up the elevator. I fit and riveted the hinge on the elevator, and
then did the same on the trim tab. I also did all the final riveting on all
the parts (mainly a few pop-rivets). With a little Boelube the hinge pin
went back in with almost no work at all.
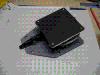
I then installed the MAC trim servo in the hole made for it, and had to do
some extra trimming to get it to go in (updated picture included here). That
is a tight fit, but with a little work it does go in!
As with the other empennage components, I'm leaving the fiberglass work until
later. With the elevators I'm not installing the counterweights now either,
as I see no value in storing them with the weights on, and potential opportunity
for damage with the weights on. They'll be easy enough to install when the
time comes .... most likely when I do the fiberglass work.
It is now time to move on to the wings. Amazing. It sure has taken long enough!
Time : 3.5 hours |
Total Time : 70.50 hours
|
|
![[ The Frye RV-7 Project ]](images/frye_project_banner.png)