|
|
Firewall Forward
The firewall forward kit isn't one of the key required airframe kits, but
has been assembled by Van's as an aid in completing the aircraft. It has
most of the odds-and-ends you need (fittings, hoses, alternator, prop
governor, etc.) to complete your FWF installation. It is common to WILDLY
modify the contents of this kit, and I certainly did. For one thing, they
don't actually have a FWF kit for a vertical induction IO-360 like I am
installing. You start with the vertical induction kit for a carbureted
engine, and add/drop components to adjust for your install situation.
Along with the usual adjustments for my engine setup, I also dropped the
throttle/prop/mixture cables because I want to get Cablecraft cables
instead. (Note: I decided to NOT go Cablecraft after all, for various
reasons. We'll see if I regret it in the future.) I also dropped all
my hoses because I'm going to work with Airflow
Performance to get exact-size custom-built hoses put together. If you want
to see what I ordered the list at this
link. But DON'T just use my list. Evaluate what YOU need for YOUR
situation and decide.
| Opened Firewall Forward Plans/Instructions |
October 5, 2008 |
|
I have a bit of tedious/slow work to do on the canopy, so want to start
on the FWF effort in parallel. Today I finally pulled out those plans and
instructions, and am going to start doing the initial FWF work this week.
|
| Firewall Recess / Battrey Box |
October 11, 2008 |
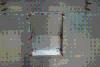
Today I spent a bit of time working on FWF stuff. This is my first real
day of FWF work, in fact. I installed the recess in the firewall for the
prop governor, and then pulled out my battery box parts and put it all
together. I even went ahead and did the modification (first seen on
Walter Tondu's builder site)
where the front face of the battery box is cut away, and hinges are used
to attach it. I had already ordered some stainless hinge material for
that so was ready to go ahead and make that change. It is all done now,
and tomorrow I'll be attaching it to the firewall itself.
Time : 6.00 hours |
| More Firewall Work |
October 19, 2008 |
|
Today I wrapped up a few activities started last weekend. With my new
Greenlee punches I cut the lightening holes in the battery box. I also
punched the hole for the cabin heat valve. I installed the heat valve
(including the platenuts needed), and installed the platenuts which are
in place to mount the clamps which hold the oil pressure sensor hose.
I fabricated the copper bar which ties the master and starter contactors
together, and installed it. I started looking at mounting various items
on the engine, and need to order a few things to wrap up that work.
Slowly but surely, progress is being made. Today felt -really- slow,
though.
Time : 5.5 hours |
| Sensor Manifold / Engine Work |
October 25, 2008 |
|
It has been a terrible week for working on the plane, with me getting
no weeknight time in (essentially) at all. Today I was supposed to launch
early for Asheville, but rain and low clouds this morning has me stuck
on the ground. So .... time to get a little RV work done, I figure!
I needed to mount the oil/fuel pressure sensor manifold block to the
firewall, but before I could do that I needed to rivet the forward upper
fuselage ribs to the firewall. I had to use an Avery pop-rivet dimple
die to get the dimples made, but that worked like a charm and avoided
having to completely disassemble the structure to get the dimples I
forgot to make made. I riveted, then installed the manifold. Done deal.
I'm taking a break to check on weather (it stinks), and am going to
continue RV-work if flying isn't an option (and it isn't, not yet at
least).
Fast Forward ---- and, no, the weather -never- got good enough to fly
up to Asheville. So be it. The upside is that it gave me more time to
work on the RV.
So, I installed more fittings as were called out in the instructions. I
didn't have my engine hoist here, so skipped the part where you install
the engine on the firewall (though I _may_ call on a friend for some help
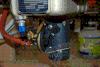
and bring the hoist home tomorrow). I looked at the install of the prop
governor .. and ended up with questions. I shelved that and then decided
to install the alternator. That went fairly well, though I think my
belt is a tad short. I'll call PlanePower on Monday to inquire. All in
all, a good bit of work got done though. I'm pleased.
NOTE: I came back later with a different idea on how to get it all put
together, and figured out how to get the alternator on -without- having
to "walk" the belt over the big pully. Once I thought it through, it was
easy.
Time : 5.0 hours |
| Prop Governor and Baffles |
November 8, 2008 |
|
I've been sick as a dog for the last week. It was not flu, but was a cold
bad enough to feel almost like flu. I missed work, and have been battling
a non-stop feeling of being tired. I've tried to get out and fiddle with
the airplane from time to time, but with no luck as exhausting and coughing
would drive me back inside.
I've been getting better, and today I actually felt like I might have a bit
of energy. So out into the shop I went!
I installed the prop governor, after installing the needed studs. I also
removed the oil line hose running from the governor to the front of the
engine, as I want to replace that with a hard stainless line.
I also started on the baffles (after having fiddled with them a bit,
unpacking and doing some test fitting earlier). I separated the pre-punched
parts made up of AL angle, and cleaned up the edges. I cleaned up and
mounted the rear baffle support as well (and realized I needed to order
a handful of star washers for the engine case, as I can't re-use the old
star washers once I take them off to mount some new doo-dad or another).
Time for a break now, before the cough comes back. :)
Time : 2.5 hours |
| Baffles |
November 9, 2008 |
|
I spent a good bit of time this morning (despite waking up still feeling
like dirt) working on the baffles. Mostly I dressed the edges of parts
and primed those pieces I felt needed a bit of primer. This would be some
of the supports that attach to the exterior of the baffles and the screw
reinforcement plates. All in all a very low-key set of activities.
After lunch I continued on the baffles. I fit the #4 cylinder side
baffle, which took a bit of filing to get just right. I riveted on the
screw reinforcements for the baffle, and was able to fit-and-file-and-fit
until the screws would go in without binding. I also riveted on the diagonal
brace, and preped the edges of the baffle that fits behind the #4 cylinder.
I also started fitting the baffle for the #3 cylinder. I got as far as
riveting the two screw reinforcement plates in place before calling it
quits for the night. I _am_ still recovering from a cold.
Time : 6.25 hours |
| Oil Cooler Head-Scratching / Odds-and-Ends |
December 28, 2008 |
|
Today I wanted to finalize where I want to install the oil cooler. I
fabricated some mounting angles as if I was going to mount it on the
firewall just to see how spacing worked out. It is -tight- there on the
firewall, and after looking at some of the conflicts I might run into
the decision was made .. for now .. to mount it on the baffle after all.
I may well fabricate an angle mount to direct the outflow from the cooler
downward (some have reported good results with that approach) but that
is about as far as I'm going to go in modifying the standard mounting
strategy. This will leave the firewall significantly less crowded.
I also spent some time today drilling another eyeball hole in the
firewall. I *hate* drilling stainless. :) With that done I wanted to
tackle some odds-and-ends and get them out of the way. One was installing
the CHT probes in the wells in the heads on the engine. I also spent
some time putting a bazillion tools away, and getting prepared to
pull the canopy off and put it on the canopy work stand. We have some
nice weather coming up in the next few days, and I think I'll tackle
the canopy painting I need to do. That'll get most of the final cosmetic
work completed on the canopy.
Time : 3.75 hours |
| Misc. Engine Activities |
January 1, 2009 |
Over the last few days I've done a few odds-and-ends, but not enough to
warrant logging. Today I got out and got busy on the engine. I decided
to install my Airflow Performance fuel controller (to help me finalize
some hose lengths, and 'cause it needed to happen sooner or later anyway),
installed my quick-drain while I was down there, installed the hose
from the fuel pump to the fuel controller, and started to install the
exhaust pipes. Again, getting the exhaust in will help me confirm hose
routing, and will allow me to finalize hose lengths and fittings.
Time : 3.5 hours |
| Exhaust Bolted On |
January 2, 2009 |
Since I want to finalize some hose lengths (as mentioned in the previous
entry) I pulled out my exhaust system and (mostly) installed it today. I
have to say that Vetterman does beautiful work. My one mistake was to bolt
on the headers _before_ trying to install the crossover tubes. It is such
a snug fit that there isn't nearly enough wiggle room (for me, at least)
to install them that way. So off came the headers, and after slipping
the parts together I bolted them back on. This means .. of course .. that
I'll have to replace the star washers. They are use-once devices, and I
had already torqued them into place. I needed to order a supply of star
washers anyway, and at roughly $0.02/each I can get 100 of each size and
not break the bank.
Time : 2.0 hours |
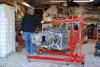
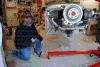
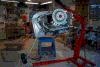
| Engine Hung / On Gear |
January 3, 2009 |
|
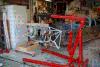
I spent a bit of time in the morning getting ready to (finally) hang the
engine. Remember that the engine is already on the mount, and much has
already been done on it in that convenient-to-work-on location. The plan
is to take the weight off the engine stand with the hoist, unbolt it from
the stand, swing it over to the firewall, and bolt it on there.
Should be easy. In theory. :)
I pulled out all the hardware needed to attach both the engine on the
firewall, and the gear on the engine mount. (Thats right, it goes on its
gear today too.) I size-checked all the holes and had to ream out the
gear leg holes on the mount to remove excess powder coating. Now all I
need to do is wait for my help to arrive after lunch, and we'll be good
to go.
(Time passes .. lunch happens ... )
After lunch Joe Sumakeris came over to lend a hand with the whole crazy
exercise. My son Chris was here too, and helped with the engine hanging as
well. Thank goodness I had them both around as the extra hands were very
much needed.
The hanging of the engine itself was a piece of cake. Since I had match
drilled the firewall with the engine mount, the theory was that it would
all go right back in place and line right up. (I'll confess to being a
bit worried that the theory would not be realized in practice.) We took
the weight of the engine on the hoist (using a pair of bottle jacks to
lift the engine stand just a tiny bit to allow the hoist legs to clear)
and unbolted it from the stand. At that point the stand became history.
When then gently lowered the engine against the firewall, making sure
everything stayed clear of the items -on- the firewall. The top two bolts
slid (partially) into place first, then we lowered the engine to allow it
to swing down into position on the lower bolts. Everything lined right
up, and most of the bolts slid right into place .. with the other few
needing a small bit of a nudge with our hands. The nuts got snugged up,
and then we started the exercise of putting the gear on. That was harder. :)
The gear legs are a tight fit into the mount (appropriately) so getting
them in place took a little work. We had the lift the engine up quite high
to get enough ground clearance because the legs had to go in quite straight.
I also had to cut the clearance notches for the gear legs while the engine
hung from the hoist, as well. Tedious, that was.
With some wiggling (and grease, which the bare steel needed anyway for
protection) we got the gear installed and the bolts in place. THEY needed
some persuasion, so I now know there will be no fretting of those bolts
under load. They are _snug_.
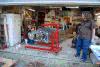
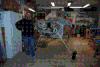
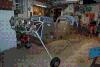
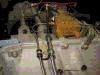
Then we lowered the hoist, and put the plane on its gear for the first
time. Wow. Amazing. It looks more like a plane than ever. This was a very
very exciting milestone. I'll have pictures when I have time to get them
uploaded. Tomorrow I have fixtures (engine stand, fuselage cradle) to
disassemble. Just like the wing jigs, they are about to vanish into
history.
Time : 4.75 hours |
| Hose Fiddling / Odds and Ends |
January 19, 2009 |
|
Today I had to figure out what to do about the one hose that clearly would
not work out right. I decided to take the one other hose which was good
enough, but not ideal, and plan to cut it down to re-make the hose that
was way too short. I'll have done re-make the longer hose (a tad longer
just to make the install nicer). If he sends me replacement ferrules for
the fittings, I can (already have, actually) 'harvest' the two fittings
off the too-short hose and reuse them. With that done, I moved onto
working on some odds and ends I had lingering.
One task was to finish up getting the cotter pins in place. With Marie's
help (holding the wrench on the bolt heads in the cockpit) I was able to
torque them, and get the cotter pins installed. I did have a little trial
and error needing to put in -616L washers to get the cotter pins to line
up while at the same time having the right torque.
Another task was to install the spark plugs on the bottom of each cylinder
so I could determine how to route the EGT probes. I want to make sure I
don't interfere with the plug installation, so stuck the plugs in place
(remembering to apply anti-seize, even).
Finally, I started bending the tubing to go in the cockpit from the fuel
pump to the firewall. Why have I not done this yet? Beats the hell out of
me. :) But I'm doing it now. I got stopped by other family tasks that
cropped up, but will finish it later this week.
Time : 3.5 hours |
| Hoses, hoses, hoses |
February 1, 2009 |
|
Today was a big "hose day". I cut the fuel-controller to purge valve hose
to splice in the fuel flow sensor. The splicing entailed installing two
new fittings where the original hose was cut. My practice making hoses
down at API sure has been exercised since I got back from SC. (And I may
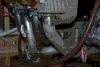
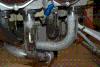
not be done. More on that in a minute.) I also installed the oil pressure
sensor hose, the fuel pressure sensor hose, and the prop oil return line.
Some of these hoses required "other stuff" be done before I could install
them. In the case of the oil pressure line I realized there were two firewall
rivets that needed to be driven ... that I somehow missed catching earlier.
Dang! With Theresa's generous help we got 'er done. Installing the hose
from the fuel flow sensor to the purge valve also entailed re-installing
the inter-cylinder baffle. What a pain those are, but I got that done too.
Installing the prop oil return line entailed installing a handful of Adel
clamps. With wisdom sent to me by Tom Malechuk the whole nightmare of
Adel clamp installation has been vanquished. Using the safety-wire trick
he told me about getting these installed really was a snap.
Most of the hoses fit beautifully. The hose from the fuel controller to
the fuel flow sensor (the one created by splitting the hose that originally
ran from the fuel controller to the purge value) is a tad too long. I'm
going to leave it alone for now, because while you can always make a hose
shorter, it is really -tough- to make it longer. But I'm thinking I'll
shorten it eventually, and use a 45-degree fitting instead of the 90-degree
that is on there now.
All in all this was an extremely productive day. I believe ALL the hoses
are in place except for the oil supply hoses, and they don't go on until
I final-mount the oil cooler. And that doesn't happen until I finish
trimming the rear baffles. But ... soon.
Oh ... and aside from airplane-work I put a new stereo out in the garage.
I've been making do with a little iPod compatible clock radio gadget which
was good enough, but whose FM reception left a lot to be desired. I finally
got tired of it, and sprung for a little reciever. MUCH better, and it
put some old (but nice) speakers we had around the house to good use too.
So today entailed a "tunes upgrade" too. Not shabby!
Time : 4.0 hours |
| Rear Spinner Bulkhead (Again) |
February 14, 2009 |
|
This morning I worked to make more metal vanish from the inside of the
rear spinner bulkhead. More swiss-cheese-ing, and attacking it with a
cross-cut file. Filing that much metal away is tiring, and tedious, but
gives total control over the metal-vanishing-act. :)
It took about 2 hours of pain-staking filing, but I got it done. And it
seems to have come out -perfectly-. I'm quite pleased. Once the cutting
was done I cleaned the parts up, primed them, and then riveted the
reinforcement to the spinner bulkhead. It is bolted in place, but may
be loosened again if I have to slide in another washer for spacing. My
hope is that once we get it bolted onto the engine we can (don't laugh
now) turn the blades by hand and make sure that there is enough space
between the blades and the spinner backplate. I'd use some blade paddles
but the Hartzell manual says :
Avoid the use of blade paddles. If blade paddles must
be used, use at least two paddles. Do not put the blade
paddle in the area of the de-ice or anti-icing boot when
applying torque to a blade assembly. Put the blade paddle
in the thickest area of the blade, just outside of the de-ice
or anti-icing boot. Use one blade paddle per blade.
.. and also says ..
CAUTION: DO NOT USE BLADE PADDLES TO
TURN THE BLADES.
(c) Manually (by hand) attempt to turn the blades
(change pitch).
The implication is that (a) we should not use blade paddles unless
there is absolutely no alternative and (b) that a normal person
should be able to turn the blades by hand. Time will tell.
Since I had more time to spend on the plane, and I could not find
prop-mounting-helpers in a timely manner tonight, I started getting
ready for the top cowl. I marked the line 2 inches back from the
edge of the skin, and drove out to the airport to bring the two
cowl pieces (and the hinges) home.
Time : 4.5 hours |
| Prop Cable Installed |
May 3, 2009 |
|
Back from Sun-N-Fun, and back from a trip to Boone to take some stuff
to my son and his girlfriend, and finally recovered (mostly) from a
cold I got _at_ Sun-N-Fun, so back into the shop it is. It has been
a month, and a challenging month it has been, too. Mainly I have been
distracted by a job change (within the company, though). Things are
a bit scary at Cisco these days, and it looked like a job I wanted and
needed might not pan out over the last month or so. But, finally, it
did. Then SnF, then settling into the new position, as well as other
activities have kept me from getting nearly as much done as I had
hoped during April. Oh well.
Anyway, today I started on installing control cables. This is one of
the last things I really want/need to do before I rivet on that top
forward skin. The prop was the one I worried about the most, so it was
the one I installed first. I _almost_ needed to re-clock the governor
a bit more, but was able to make it work out. Up against the forward
stop I have the control head not quite bottomed out, and pulling back
I can hit the rear stop. Perfect. It was tedious to get done (and I
made life a little easier by pulling out the battery box), but it is
a done deal now.
The cold (what is left of it) is getting the better of me now so I'm
calling it a night.
Time : 2.5 hours |
| Start On Top Cowling |
May 10, 2009 |
|
Leaving the throttle/mixture cables for later, I decided to start on my
cowling work. Previously I had thought that I'd need to rivet the top forward
fuselage skin on before working on the cowling, but talking to Ken at Van's
he confirmed I could get away with just cleco-ing things in place instead.
In fact, his recommendation is to leave that forward top skin off as long
as humanly possible just to ease access.
I dug out the hinges so I could fit/drill the hinge for the top cowl first.
After figuring out which hinge was the correct one for the top edge of the
firewall, I cut it to length and clamped it in place with side-grip clecos.
A quick round of drilling (and inserting clecos from the -underside- so they
would int intefere too much with the cowl fitting) had that task done.
I then placed the cowl and checked the fit against the spinner backplate. I
-may- need to fiddle/sand/reshape the front a bit, but am unsure at this
point. I'll make a final decision as I get the fit closer to correct, but I
do know lots of folks have had to make adjustments there. I did an initial
cut just to get the back edge of the cowl inside my 2" reference line.
Next I fit the other half of the hinge, cutting it to length and then doing
the job of filing the eyelets where the hinge curves. The fit seems quite
good now, and I'm ready for the next steps. Maybe I'll get more done this
week (and I know Saturday is already booked, so no work will happen then).
Time : 4.5 hours |
| More Throttle/Mixture Cables |
May 25, 2009 |
|
First, Happy Memorial Day! And thanks to all those who have served, and
still do serve, our country. I thank you.
I spent this morning getting the throttle cable installation finalized.
At this point I'm ready to say I hate those traditional eyeball firewall
passthroughs. Oh, they work great, but are a pain in the posterior to
install. The fiddly little screws with the fiddly little lockwashers and
the messing with holes in stainless steel are not (for me) fun. But I'm
getting it done.
SO ... after all my griping about how the original mixture cable would not
work, as it turns out (once I get in there, cut the firewally passthrough
hole, and see the geometry of everything) it is the right length after all.
Go figure.
One thing frustrating about this installation is that the mixture arm is
a bit further back toward the firewall than the throttle arm was. This
causes things to be much tighter with respect to distance from the firewall
and from the engine mount.
I think I'm close to getting it worked out, but have hit a hard-stop time
tonight and will have to wrap it up later.
Time : 5.0 hours |
| Spinner Rear Bulkhead Platenuts |
June 4, 2009 |
|
Today was a weird day. I went into work and could not access any of my
corporate internal accounts. I contacted our internal support folks and
discovered why. They had all been deleted! I had been in a group who was
having its project "off-shored", and as such was in a position where if
I didn't find another job in the company I'd be subject to a layoff. I
_did_ find another position (after much hunting, and waiting, since it is
a crazy time job-wise these days) and had been in that position for well
over a month. My last day _would_ have been Monday, and it seems that my
name didn't get removed from the "this guy is toast" list. By Thursday
morning, my accounts were scorched. I contacted my manager and let him
do the heavy lifting of getting my accounts re-enabled.
As for me, I went home and worked on the plane a bit. :) I got all the
rivet holes drilled for the platenuts, drilled the screw holes to final
size, deburred everything, and riveted the platenuts to the rear bulkhead.
It was a slow tedious job (what isn't??) but somehow plesant in a quiet
zen-like way. The dog kept me company, and we had a dandy time.
Time : 2.0 hours |
| Front Spinner Bulkhead Screw Layout |
June 6, 2009 |
|
Today was pretty much a "family day", but this evening I did sit down
and take care of one small task. I needed to lay out the screw pattern
on the front spinner bulkhead, and came up with a truly geeky (but easy)
way to do it.
The plans call for 6 screws evenly spaced around the bulkhead. That means
a screw every 60 degrees. I thought about drawing a circle the diameter of
the bulkhead on paper with a compass, and using a protractor to lay out the
60 degree increments around the circle. At each of the 60 degree points I
would place a tickmark. Then I would center the bulkhead on the paper and
and at each tickmark make a sharpie mark on the bulkhead to note the screw
location.
But I didn't have a compass, nor a protractor, and realized I had an easier
way to make the template.
In the past I have hand-crafted Postscript (for fun, if you can believe it)
and used those old skills to do this job. A quick bit of PS hand typed did
the trick. Because I'm a real geek I'm making the
PS file and resulting
PDF file available here
for your entertainment. (Just click on the respective links in the
previous sentence to get each version. The PDF is what you would
expect, but the PS is really just an ASCII text file for those of you
who are geeky enough to want to know how hand-crafted Postscript looks.)
Note that I made sure the tickmarks did not fall on the narrow side of
the paper, as the front bulkhead spinner is almost exactly (barely less
than) 8 inches in diameter. This orientation allows all the tickmarks to
fully fit on the printed page.
And, yes, it says something that hand-writing Postscript was, for me,
easier than finding a compass and protractor. So sue me.
Time : 0.5 hours |
| Spinner (Almost) Finished |
June 7, 2009 |
|
Today I put the template (see above) to use, and drilled my forward
spinner bulkhead for the screw holes. I then reinstalled the spinner,
double-checked that it was tracking true, and drilled the holes
through the spinner by looking for the holes in the bulkhead. The
fiberglass is translucent, so you can (if you are careful enough,
and in one case I was -not-) see where to drill the holes.
Word to the wise ... drill ONLY the screw holes first. I made the
mistake of drilling both the screw holes -and- the rivet holes for
the platenuts. This caused me to .. in one case .. think that a
rivet hole was the right place to drill the spinner. A little epoxy
and cotton flox fixed that up, but it could have been avoided
completely with a slightly different build process.
Except for the one hole I am letting cure overnight, all the holes are
drilled full-size and counter sunk. Platenuts are in all the bulkhead
locations, and the countersunk screws are -almost- completely flush.
I'm going to cut the countersinks a tad deeper in time, but for now I
wanted to make a point of not going too far until I was 100% certain
everything was as I wanted it. Plenty of time later to dress them down
a bit.
Time : 3.75 hours |
| More Cowl Work |
August 1, 2009 |
|
Today it was back to hacking on the lower cowl. I finally got the leg
slots roughed out, and now I'm working on fitting the bottom cowl to
the top. I decided I needed a better way to support the forward part
of the upper cowl so am fabricating a brace I can clamp in place. It
is proving to be a little tedious, but I'm just about there.
To aid in fitting I did something I should have done ages ago ... I
pulled both halves of the cowl off the plane, carefully fitted them
together, and then drilled for the screw holes just behind the spinner
that hold the top/bottom forward sections together. That will help
me confirm alignment when everything is moving around up on the plane.
Time to get ready to go to party now .... I don't think they'd appreciate
me showing up in the shape I'm in right now (f'glass dust, wood dust from
the top-cowl support I made, sweat, dirt, bits of spider webs, and a
general unkemptness that would be appalling in bum on the street). Such
is the nature of airplane construction, in the south, in the summer.
Time : 3.0 hours |
| Oil Door Finishing |
August 30, 2009 |
|
Today I ripped off the peal-ply off, and poped out the oil door. The
flanges came out great. I measured the width I wanted and then with
the drum sander in my die grinder (for the bulk work), and then files
to finish, I trimmed the flanges down. The fit is perfect. I then
launched into installing the Hartwell latch which was tedious, but
easy enough to do.
I did a first round of fitting the hidden hinge .. just to discover I
had not really thought through the geometry. Oh well, a little micro
to fill the holes is no big difficulty. To get the hinge back where it
needed to be, however, took hogging out a little of the foam above the
oil door. After I did that I wanted to re-seal it so got out the epoxy
and first put a thin epoxy-only coat on the foam, then mixed in some
micro to fill the drill holes, and then with that done mixed in some
more micro to help level the area where the hinge will be mounted on
the cowl once this is all cured.
With that done I wasn't ready to quit for the day so I did some sanding
on the bottom cowl at some areas where I had marked a need for tweaking.
I then finished up the bottom cowl lower attach plates, primed them, and
got them ready to rivet.
Time : 5.75 hours |
| More Cowl Fitting |
September 20, 2009 |
|
I finished the drilling with much less trouble than I expected. Ideas in
the night helped speed me along once I got started back again. It was then
time to finish up the fitting ... and I came to realize that I had left a
bit more "meat" on the bottom cowl than expected.
Truth be told, I didn't want to try and get the fit perfect before I had
hinges to tie it all together anyway. My luck with duct-tape-jigging has
not been as good as I would like. So I spent a LOT of time marking where
I needed to sand, taking the hinges off so they were out of the way,
sanding, and putting it all back together again. Lather, rinse, repeat.
Joe came over and helped me cleco hinges on-and-off-and-on-and-off so
that was a huge help.
In the end, we got it all to fit. In fact, once I got to the point where
I could get all the pins by hand (even if they are still a tad tight) I
just wanted to stand there and look at it for a while. I couldn't bring
myself to take it all right back apart, wanting to savor it a bit.
So I went flying. :)
Time : 4.25 hours |
| Cowl Hinge Riveting |
September 25, 2009 |
|
Today was a day off from work (unfortunately, it was -mandatory-, but I'll
avoid getting on my rant about that). I spent the morning fiddling with
my APRS toy. I got it installed in the Citabria temporarily
and gave it a short test flight. Weather was iffy this morning, but good
enough for a quick .4 hours to test it out. The link above will take you
to my APRS page, and if you look at it soon enough you'll
see today's flight. Later ... well ... it'll have been superceeded by newer
flights. Such is the ephemerial nature of the net.
Anyway, with that done (successfully) I pulled it back out and adjusted the
programming. I realized after looking at the track that it had been left set
up for ground tracking, and some changes were needed for airborne tracking.
Its ready to go back into the plane now. I'll probably test-fly it again on
Monday since weather is supposed to be much better by then. (That'll be yet
another mandatory day off from work ... I swear I won't rant about it here.)
After lunch I worked on getting ready to rivet the hinges on the cowl. This
mean mainly a good bit of countersinking. With that done I pulled the cowl
back off the plane, and started riveting the hinge which is on the firewall
side. And ... I got lucky. It wasn't planned, but the rivet holes down low
were mostly in line with the gaps between the eyelets. This is the area
where some people run into interference with the engine mount if they are
not in line with the gaps between the eyelets.
Even with lining up with the gaps, and having a small thin-nose no-hole
yoke ... I still had to make some "tool adjustments". The width of the nose
of the yoke was wider than the eyelet gap. Dang it. So I had to talk myself
into grinding the nose down. This isn't an easy thing to convince oneself
to do when the damned yoke cost in the neighborhood of $100 each. But with
that adjustment it fit great and I was able to set those rivets with -no-
trouble at all. Higher up the alignment failed me .. but by that point I had
room for a regular yoke with a tall flat die in the nose. I won. They are
all done.
Oh, and I reinstalled the exhaust tail pipes now that the cowl work is all
done. (Tip .... put the springs on the -front-, not in the -middle-. Ask
me how I know.)
Time : 3.0 hours |
| FAB-ing Forward |
October 10, 2009 |
|
Tired of my FAB puns yet? Probably. Anyway, I got out into the shop this
morning and got in a good day's work. I did the upward bend on the FAB
top plate to match the alignment with the cowl inlet, marked the location
of the top plate when resting on the filter, measured down 1/16" as they
say I should and marked the location so that the filter would be compressed
when everything was assembled.
I then drilled all the rivet holes (except for those on the snout, in case
I needed to do some glass-work on the FAB to upturn the entry a bit to
match the cowl inlet), and then remounted it on the engine to check the
alignment. Much to my surprise, I didn't need to do any glass-work on
the FAB after all. How this happened is a mystery because I _always_ have
to do anything that is marked "optional". This time I got let off the hook.
(I worry this means something is wrong .. but I looked at it a half-dozen
times and it is perfect.) I finished match-drilling the holes to the glass
bowl, and then using a die grinder with a sanding drum trimmed down all
the excess flange. What a -mess- that makes.
I also started work on the alternate air door, with everything ready to
assemble at this point. I primed the top plate and the outside of the
bowl (not priming/painting the inside 'cause I don't want flakes of paint
to ever start getting loose in the inlet air stream). I need to let the
primer dry, need to do a round of sanding on the bowl to clean it up a
bit more, do another round of priming, and then shoot with white high-temp
paint. I'd keep working tonight but as it turns out the white paint I
have is NOT high-temp, so I need to do a run to the auto parts store.
A darned good day of work. I'm well pleased. :)
Time : 5.25 hours |
| More Baffle Shennagans |
November 22, 2009 |
|
I got an answer back from a local RV-7A builder who agreed that the
ramps should -not- be flush with the cowl (no matter what the picture
in the instructions makes it look like). I trimmed them back a bit,
got the gap such that they are a bit lower (the thickness of the
baffle material, roughly) than the back edge of the cowl opening, and
I am well pleased with the results.
I finished fabricating the left baffle ramp support ... after having
to re-fabricate the piece that bolts to the engine. It seems that I was
a bit premature in match-drilling it to the angle, and adjusting the
ramp on that side caused the correct positioning of the angle to have
changed. But I simply dug out some .063 AL, used the old one as a
pattern, and made a new one. Easily done.
I'm also going to NOT use the cylinder baffles for #1 and #2 cylinders
as they come in the kit. They rivet in place, and all too often folks
need to tweak/change/adjust them to get cooling right. Today I made
a pair of matching ones, but with a flange at the bottom so that I
can put nutplates on the baffles and simply screw them in rather than
rivet them on. This way I can remove them later and tweak/adjust as
much as I wish (including fabricating completely new ones) without
having to take my baffles off the engine.
Of course, this means they'll be perfect from the begining, but even
if that is the case then the work I did will have been a good investment
of time. :)
Time : 4.75 hours |
| Baffle Trimming Continues |
January 17, 2010 |
|
So ... why has it been 16 days since the last update? Well, for starters
we were out of town for a week, so that accounts for 7-8 days right
there. However, near the end of the trip I picked up a cold .. which was
no big deal, until I got a secondary respiratory infection. It has laid
me low for almost a week itself. Bummer. I'm still recovering, but feel
up to getting out into the shop a _little_. Every hour in the shop moves
the project forward.
Today I worked on those nagging back corners of the baffles. On the left
side they are very hard to mark, so today I took off the bottom cowl and
used a forward support/jig that I had used earlier for some of the initial
cowl work. It doesn't position the front of the cowl at the _perfect_
height, but it is damned close. That allowed me to reach up from under
the cowl and mark those otherwise hard-to-reach corners. They are now
trimmed, and I think it is time to install the top ramps in the cowl so
I can trim the forward-most sections of baffle. I also was able to final
position the baffle piece which serves as a "filler" above the oil cooler
thus keeping the baffle seal from having to jog rear-ward. As it turns
out I could have installed this sooner, but I wanted to wait until all
the initial trimming was done to be sure of the positioning. With that
in place I can also now posiiton the oil cooler doubler, and have drilled
it to the back baffle.
I called it quits as I got tired this afternoon ... not wanting to provoke
a relapse of this damned infection. I need to do a little more drilling,
some trimming of that last baffle piece, and then cutting out the hole
for the oil cooler.
Once that is all done there will still be a number of details left to
address. Installing the spark plug wire seals, routing the purge valve
control cable, priming the baffles, painting the baffles, with the last
step being installing the baffle seal. I'm getting close.
Time : 3.25 hours |
| More Baffle Trimming / Exhaust Hanger |
February 7, 2010 |
|
First, congrats to the Saints on the Super Bowl win. It was fun game to
watch and there is always something special about the underdog winning
the game. (Yes, I'm writing this on the 8th.)
Yesterday I tried to open up the hole in the baffles for the prop oil
line to pass through. I am using a hose with firesleeve, the style with
a stainless steel band on the end. That band with the firesleeve makes
for a "fat end", and creating enough room isn't going to happen.
I burned a lot of time messing with this, and then messing with trying
to find alternatives. In the end, I'm just not going to be satisfied
with anything short of a stainless steel hard line. *sigh* I already
screwed up one pretty piece of stainless, though that time I tried to
route it very tight to the engine and the bends were "ambitious". If
I fabricate one which follows the more generous routing of the hose I
think I can fab it without trouble.
That being said, I pinged my favorite engine guru down at Airflow
Performance (Don Rivera) and he came back with some good suggestions.
Don is always there for us home-builders ... I can't being to say how
many times his advice and insight has helped me out.
After deciding to put the oil line on hold, I put the cowl on (now with
newly-installed top cowl inlet ramps) and carefully marked the trim line
for the outer baffles. I did some rough trimming with shears, but it was
tight enough that in the end I had to finsh the removal of material with
a nibbler to get the bulk of the AL out of the way, and then a file to
finish off the curved trim line. They look pretty darned good.
I was about to call it a day, but decided to fiddle with the exhaust
hangers. Talking to another local A&P who does a lot of work on many of
the experimentals in the area ... he said that even the newest of hanger
solutions from Vetterman have failed in operation. He suggested another
way to skin the cat, and has tried it on an RV6 with good success.
His solution? Use a piece of automobile tire sidewall (i.e. heavy rubber)
suspending the exhaust from an Adel clamp attached to one of the engine
mount down-tubes. Eventually the rubber will deteriorate, but at that time
another slice of old tire sidewall can easily replace the old. It makes
sense to me, and has proven to work in at least one case. I'm gonna give
it a try.
Time : 7.0 hours |
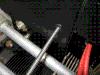
| Prop Governor Oil Line |
February 27, 2010 |
|
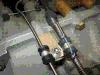
I've been unhappy with the line running from the prop governor up to
the front of the engine. It was a hose with firesleeve, and the band
clamp on the forward end was so "lumpy" it really didn't fit through
the baffle well. I had once before tried to fabricated a stainless
line ... but was too ambitious with my bends, and screwed it up.
I thought I was going to live with the hose until the baffle situation
cropped up, then I decided I'd try fabricating a stainless line again.
If I routed it basically the same way I did the hose the bends would
be less ambitious. When I called Don Rivera down at Airflow Performance
to see if he would send more stainless my way ... he suggested that
he come up and just give me a hand. It was an excuse to fly, said Don.
This weekend the timing and weather worked out, and Don (along with
one of his people, Mark) flew up. I met them at TTA around 11:00
and we headed back to the house. After a bit of figuring and fiddling
and fussing the line was done. Beautiful.
While they were here I asked them both to both give a good hard look
at the work so far .. and I got a big thumbs up from Don. They did
find one of my bends on one of my first pieces of tubing to not be
ideal, so that will be replaced.
I can't say enough about Don, his team, and the support that I've had
from Airflow Performance. I feel like I've not just found a good vendor,
but have found a friend. Airplane people are the best.
Time : 1.5 hours |
| Baffle End Game Continues |
March 14, 2010 |
|
Today I finished the last bit of trimming on the front center
baffles. You can't imagine how thrilled I am to be done with that
phase of the work. I finished drilling the holes for the baffle
seal in the front center baffles, and then finished the rest of
the painting.
I also went and tracked down some stainless socket-cap screws to
attach the baffles with. I've been using some steel socket-cap
screws, and have liked how easy they were to install/remove, and
how they looked. But they have been used so much all the black
oxide coating is rubbed off and they are already starting to rust.
I could use the phillips head screws that came with the kit, but
thought the stainless would look better with the black. I don't
know if I'll keep them or not, but for now I'm pleased with how
they look.
That all sounds nice and simple, but took forever. This is tedous
stuff. I still need to install the bolt and spacer on the lower
portion of the cylinder #4 baffle, then it is time to install
the baffle seals. After that, all the stuff that routes _through_
the baffle (purge valve return line, spark plug wires, purge valve
control cable). I'm getting there.
Time : 5.5 hours |
| Breather Tube and Baffle Seals |
April 4, 2010 |
|
Happy Easter, everyone! While it is easter, and we do have family
plans, I did want to see if I could get a little done today. I've
put the oil cooler on hold, and am tackling other things that need
to get done. One of the things I've not gotten around to doing is
installing the oil breather tube. It went on today, and I only had
to bleed a little to get it done. Man, the firewall area is getting
tight to work on.
I also decided I was confident enough that the baffles were basically
done that it was time to start installing seal material. I only had
a little time to work before the kids got here, but have already
gotten a bit of seal material installed. My technique of using some
thin washers on the back-side of the material to spread the load
from the pop rivet looks like it is going to work quite well. Time
(and vibration) will tell the tale.
Maybe more once easter dinner is done .. then again, if I fall asleep
afterward, maybe not. We'll see. :)
Time : 1.25 hours |
| Purge Valve Cable (again) |
April 24, 2010 |
|
I'm back from Sun-N-Fun, back into the groove at work (sorta), and back
working on the RV. One of the things I had decided before leaving for
SnF is that I didn't like the bowden cable for the purge valve. It was
a nice simple install, except it mandated a return spring in case the
solid end broke (and, face it, it will one day) and it also had detents.
The detents at the begining and end of the travel are fine, but the ones
in the middle were annoying.
I decided to install a different cable, and got a button-lock 10-32 end
(for a rod-end-bearing) cable from Aircraft Spruce. They didn't have it
in stock at SnF, so they ordered it and ate the shipping charges. The
cable made it home before _we_ did.
Today I go to install it, and since this is different I've had to mess
with making some changes. I'm not quite there on the install, but am
getting close. I need a way to anchor it at the back baffle, and am in
the process of creating a bracket for an adel clamp. (The bowden could
use a nice pass-through cable clamp, but that doesn't work for the more
fancy cable.) I should finish that up tomorrow.
Time : 4.5 hours |
| Purge Cable / Oil Line |
April 25, 2010 |
|
Today I got back to work on the purge valve cable install, and made
ANOTHER bracket for the adel clamp which I'll install at the spot where
the cable comes through the rear baffle. It is fab-ed, painted, and
ready to install. [UPDATE: I decided to not use this after all, and
am simply passing the cable through the baffle with a grommet and
anchoring it to the mount. It -can- move, and -may- erode the grommet
in time, but I'm thinking the movement will be slight. I've gotten
a few A&P-type folks to look at my install and both have said it
looks fine to them.]
While the paint was drying I wanted to start work on replacing the one
oil hose that was too short. Step one ... take the old one apart. The
fireshield came off easy (of course), and one fitting came apart with
no trouble. The second one gave me grief trying to get the rear part of
the fitting (the "nut") off of the hose. Basically, the little brass
insert was wedged in so tightly it would not come apart.
Eventually I made a tapered mandril out of a wooden dowel, cut the
stub-end of the hose very short near the fitting, pulled the teflon
core out with pointy-nose vise-grips, and mashed the remaining stainless
braid into the fitting. I then used the fabricated mandril to drive the
brassh insert out. What a pain in the ass. I bet Don (from Airflow, who
brought me replacement hose parts down to Sun-N-Fun) never has these
kinds of problems! He being a pro, ya know. But I got it out, and am
now ready to fit up a new hose.
After lunch I came back and started working on building the new hose. I
first put the 45-degree end on, then put it on the engine. With that in
place I figured out how long it should be (it really is only going to
be barely 2 inches longer than the original ... kinda frustrating). The
45-degree end went on without fanfare. The other end was a bit tougher.
For some reason the braid on the cut end wanted to flair out even with
the duct-tape on it. (Maybe I didn't use enough??) But I had to use the
mash-it-in-with-the-flat-of-a-blade-screwdriver technique to get it to
allow me to put the back-half of the fitting on. After that it went
together fine. Firesleeve in place, with red RTV closing off the ends,
I set it aside to cure/dry. It will go on after work tomorrow night.
It doesn't sound like much, but for me building that hose consumed the
better part of 2 hours. Again, I bet Don could do it faster. :)
Time : 4.0 hours |
| Purge Valve Cable Finished |
April 29, 2010 |
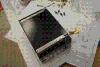
The parts I ordered from ACS came in today (another firewall eyeball, and
some appropriately sized rubber grommets) so I could finish up the install
of my purge valve control cable. The pictures (I'm finally getting around
to uploading pictures again!) pretty much tell the story. I intend to get
feedback from some A&P-type-folk I know on whether the way I've installed
this is robust enough or not. But I wanted to safety the end of the cable
in case the adel ever ceased to grip well enough, used the big-washer on
the rod-end bearing in case the ball ever gets out of joint, and used a
pair of adels to anchor the cable after it passes out of the rear baffle.
My one real question is whether there will be enough relative movement
between the rear baffle and the anchored cable to cause problems with
the grommet. Time will tell.
Time : 1.5 hours |
| Hoses Once Again |
August 7, 2010 |
|
After a month lay-off from RV work (due to having to deal with getting
the Citabria back flying, doing a hurried engine break-in, planning for
an Oshkosh trip, flying to Oshkosh and back, and then a post-trip oil
change) I am finally back at it. Today I started on the last round of
fiddling with hoses.
I fabricated a longer purge valve return line hose, which went together
with no problem. I then modified the hose that goes between the fuel
controller and the fuel flow sensor. It had a 90-degree fitting coming
off of the fuel controller, and I wanted a 45-degree to make the
routing nicer. Don supplied me with a replacement 45-degree fitting
and the swap was made in just a few minutes. The routing is MUCH
nicer.
Along with making that change, I had to change how the fuel flow sensor
was mounted to the engine mount. It had to move up and forward a bit
to avoid having the hose from the sensor to the purge valve chafe on
some stand-offs we installed for the oil line to the prop governor. I
had to fabricate a new (simpler, frankly) bracket to hold the sensor
and it came out very nicely.
Now all I have to do is open up the hole in my baffle (again) to get
the new purge valve return line hose through. I do hate the big lumps
on the end of the hoses created by the stainless band clamps. Oh well.
More after lunch ......
During lunch I decided I needed to open up the hole in the baffle so
much that the grommet I had would no longer fit. So I fabricated some
AL plates (one with a joggle) that would cover the hole, and which
had a hole in it exactly the right size for the grommet. They were
fabricated as two overlapping plates (I guess I need a picture).
With that done I re-installed the baffle, installed the hose, installed
the plates, and then anchored the hose to the engine mount about mid-way
on the length of the hose. The 45-degree fitting I elected to use on
the firewall end was perfect to get the hose headed in the right
direction.
This was a great day of work, and I am thrilled to be back making some
progress on the RV.
Time : 5.5 hours |
| Cowl Snout Glassing |
October 2, 2010 |
|
September was a dead loss. Total washout as far as RV-work goes. Blame
it on too much "real life" getting in the way (work, family activities,
travel, and other distractions). BUT, now I'm back on the move and I
am digging back into the RV construction biz with vim and vigor.
Today I tackled one of those things that always strikes me as very very
tedious. I had to shape a foam block to fit in the back-side of the
lower cowl snout so I could extend the snout back to the FAB. In theory
this is not a big deal. In practice it means getting the foam block to
actually fit in place, secure it so it won't wiggle loose, carve out
the innards to match between the FAB and the snout, then glass it in.
Glassing is messy. Carving foam is messy. Messy things are annoying so
I put them off as long as I can. That said, this went pretty darn well.
I shaped the block to fit into the snout and then did a rough cut on the
depth. I then put the lower cowl on (and off and on and off) and shaved
down the back of the foam block until I got a snug fit. I first drilled
a 1-inch hole through the block right in the middle of the opening, and
then used a bit of hot glue on the corners to nail the block into the
cowl.
I attacked it with implements of destruction (files, a knife, a saw
blade, more files, and finally sandpaper) to get it shaped to the cowl
snout and FAB. I then tediously laid in one layer of glass, and walked
away. :)
Along the way I opened up the screw holes on the lower-rear of the cowl
because the "floppiness" of the cowl means that getting them to align
_perfectly_ every time wasn't going to happen ... and I was using tinnerman
washers anyway so that should pull the cowl nicely into place. That made
a world of difference and now the screws go in with no problem at all.
Time : 3.0 hours |
| More Cowl Snout Glassing / Misc Other Stuff |
November 20, 2010 |
|
Today was a "Grand Central Station" sort of day. George and his son came
by to visit. I let his son, Ranen, rivet a couple pieces of AL together,
and he was thrilled. It also gave him something he could take home and
show everyone, as well. That was fun. Then Ernest came by to bring me his
bit rack of wire ... as I'm starting to need to wire sometime real soon
now. Then later Joe came by to visit, and got caught up on where I was
on the build. It was gratifying 'cause Joe has not seen the plane in a
few months and _his_ perception is that I'm hustling right along. That
is so in opposition to _my_ perception it isn't funny, but it sure made
me feel good. Thanks Joe!
This is going to be a bit of an odds-and-ends entry rather than breaking
the various activities up over multiple sections like I should. So sue
me.
I did some measuring earlier today, and the snout had too large a gap down
one side. So more glassing was done. We'll see tomorrow what more might
be needed after the current round of layups is cured.
I also spent some time thinking about how I want/need to route wires to
the back of the plane. Right now there are only two wires and one multi-wire
cable going back to the tail. The two wires for the tail-light, and the
multi-wire cable (ordered from Stein) for the trim servo. That is all so
light-weight that I decided to NOT run conduit after all. I'm doing the
thing that people say "don't do it!" about. I'm using zip-tie sticky pad
anchors. Why? Well, they are carying NO weight, and they are on the floor
of the fuselage so they are not even having to carry their own weight
against gravity. They are just so the wires won't flop around and chafe.
I decided it would be good enough.
The goal is to get the various wires routed and so that I can close out
the rear fuselage. Theresa has agreed to help me rivet that skin on over
the Thanksgiving holiday. I'm anxious to do it, so want to get things to
a point where I'm really ready.
In the spirit of getting the back-end of the plane ready, I also mounted
the shoulder belt attach cables. I needed another pair of hands (awfully
handy that George showed up at that point) to get it done. But its done.
Time : 3.5 hours |
| Spark Plug Clamps |
November 25, 2010 |
|
When talking with John out at the flying club the other night, I noticed
these really nice clamps holding the lower spark plugs in place and asked
where he got them. As it turns out they are made by Slick (or whoever owns
Slick these days .. Champion?) and are specifically designed to hold the
spark plug wires in place. There are two flavors, one to hold a single
wire (for the forward cylinders) and one to hold two wires (for the rear
cylinders). I ordered two of each, and got them installed today. Nice!
They are VERY hard to find in the Aircraft Spruce catalog. So for posterity
I am recording the ACS and Slick part numbers here.
- 08-04393 SLICK M2755 TWO WIRE CLAMP ASY ..... $7.50
- 08-04392 SLICK M2754 SINGLE WIRE CLAMP ...... $2.90
Of course, when I need some again I'll never remember where I recorded it
in my builders log, but at least now I can grep for SLICK and eventually
I'll find them. Right??
Time : 0.75 hours |
| Cowl / Alternator Wires / Baffles |
November 26, 2010 |
|
As you can tell from the title to this entry, today was a lot of odds
and ends. I did a little more work on the cowl snout (it is amazing how
many iterations this thing is taking, but we are getting close now). It
_may_ be done. I'm going to look at it again tomorrow, when I'm not
tired of looking at it, to see what I think. If it is done then I'll
rivet the baffle seal material onto the FAB and we'll call it completed.
The other bit of work I did on the cowl was to confirm that my attempt
to make the
McFarlane baffle seal material
took the set that I hoped it would. It DID. At least enough to make a
difference. I can now get the top cowl on without having to resort to
rediculous measures. With that done, I riveted on the two pieces that
had been left clecoed .. well .. forever. They are the two forward-most
outboard pieces of the baffle seal. I now only have the inner forward
seals to put in place, and I'll do them tomorrow. Thank goodness. It'll
be nice to have that completed.
Oh, and you want to know how I got them to take a set? Ok, I'll tell. It
was two different things that went into the mix. The first was to try
heating the material with a heat-gun (suggested by Joe) to see if that
would help. It did .. temporarily. But it didn't last long enough. So I
took all my various vice-grips and clamps and used them as weights to hold
the seal material bent over. I then heated the material and LEFT the weights
in place overnight. With that done, it ended up with enough of a set that
the top cowl can go on without a fight. Woo hoo!
I also secured the bottom of the baffles (the bits that bend around the
cylinders) on the left side of the engine tonight. I did the safety-wire
through the nylaflow tubing routine. I only did the left-hand side because
the right-hand side may have to come off ONE MORE TIME. *sigh* But I'll
get it eventually.
I also spent some time routing the field and alternator-out wires down
the B-lead wire. Rather than route it through the Adels (which frankly
looked like it would pinch the smaller field/status wires badly) I just
wrapped it around the B-lead and secured it with a few zip-ties.
Time : 3.0 hours |
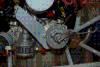
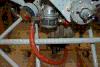
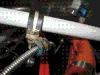
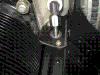
| Governor Oil Line Passthrough |
December 24, 2010 |
|
Most of today has been consumed by pre-Christmas activities (and most
of last week was consumed by work-insanity). But I did get out and
finish up (yes, you heard me right, finished up) the governor oil
line passthrough on the baffle. I have probably done my usual over
design job again ... but I am happy with it.
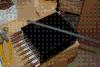
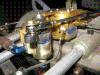
In the picture you can see what I elected to do. I have a piece of
that classic black baffle material used as a "gromet". It is held
down with a small plate. The screws are screwed into three rivnuts.
I went with rivnuts instead of platenuts because the metal is so
messy in that area drilling extra holes for the keeper rivets on
the platenuts was looking to be a pain in the rear. Since this
is not a structural fastening I felt the rivnuts would be totally
adequate. Time will tell. If I prove to be wrong ... I will just
have to remake that part of the baffles. After doing it once (and
now having templates to work from) doing it again would not be
the battle that the first pass was. (Famous last words??)
With that behind me, I will be on to new stuff tomorrow. My goal is
to finish up the last of the baffle-stuff over the next day or two.
Won't that be cool?? :)
Time : 1.5 hours |
| Baffle Seal Completed |
December 27, 2010 |
|
Today I wrapped up the baffle seal around the spinner. Good grief, was
that tedious. The top cowl was on, and off, and on, and off, and on, and
off ... well ... you get the idea. Each iteratiom had the pieces of baffle
seal coming off, getting trimmed, and going back on. I could not just mark
and trim the seal material all in one shot because until I got it trimmed
somewhat .. the top cowl wouldn't go on the whole way.
It was tedious ... but is is done now, and I'm well pleased.
I also spent some time installing the baffle seal material on the FAB
to cowl snout intersection. The only thing tough about that is I am
_tired_ of pulling those stubborn pop-rivets. I thought I would need to
cut slots in the baffle material to make getting the cowl on/off easier,
but I was able to easly enough work the cowl on without any extra slots.
I'm quite pleased.
Time : 4.0 hours |
| Odds and Ends |
January 8, 2011 |
|
Today vanished. In fact, last week vanished. I was back from a holiday
break and into the old grind, and it made the time go in the blink of
an eye. Today was busy too, and tonight we have friends coming over. So
very little got done on the plane. I hope for better tomorrow. :)
Anyway, one of the things documented as a comment elsewhere was adding
standoffs to the engine sump so that I can run wires around the front
and down the right side where there is lots of room whereas there is a
lot less room over on the left side. I did not like the nuts and star
washers used, and replaced them with metal locknuts. I feel a good bit
better about that (never mind that star washers and regular nuts are
used elsewhere on the sump). I also measured for coax, and have a rough
idea of how much I need (and will buy a bit more to be sure). I also
hauled out the EGT/CHT harness to start looking at installing that, and
given the fact that the connector is already installed on one end I
will finally have to make a decision on the firewall passthrough
technique I want to use. I also need to talk with Stein and the folks
at Advanced to make sure I know what I am doing with those thermocouple
wires.
So .. a little done today, and hopefully more tomorrow.
UPDATE: I decided I did NOT like the standoffs, removed them, and
routed the EGT/CHT harness wires differently. Documented in the
Electrical section since that is getting into the whole issue of
wiring.
Time : 1.25 hours |
| 90-Degree OFA, Part 1 |
April 21, 2011 |
|
The 90-defree oil filter adapter arrived last week, and I finally got
some time tonight to work on it a bit. First, the old Superior filter
adapter had to come off. Of course, to get it off I (*grrrrr*) had to
remove the mags. Once I got the mags off I could get the old filter
adapter off, no problem.
The next step was to confirm that the new filter adapter was going to
fit. It would .... if I had a 1-inch spacer. As it is the adapter fits
fine, with the exception of the filter itself hitting the engine mount.
I didn't buy a spacer while at SnF because I didn't know if I'd need
one or not. I couldn't know until, well, tonight. I thought this would
be no big deal _until_ I had to remove the mags! *shesh*
So, I stuffed rags in the holes where the mags go (to keep crud out
of the accessory case) and left the mags off. I also taped over the
pad where the OFA goes, and will order a spacer from B&C tomorrow.
This little boondoggle is _not_ their fault, as they can't know how
every engine and engine mount is arranged.
I will say that the OFA really looks nice. Beautifully machined, and
everything (including a little container of Loctite 518 gasket lube)
is included in Bill's kit. Now if I can get a spacer in my hot little
hands sometime next week, I'll finish up that task. That'll be the
90-Degree OFA, Part 2 entry. :)
Time : 2.25 hours |
| 90-Degree OFA, Part 2 |
April 27, 2011 |
|
My 1.4" spacer came via UPS from B&C today, and that gave me everything
I needed to finish the install of the 90-degree oil filter adapter. I
have to say, everything I've gotten from B&C has been of the finest
quality. Since I was ready for the install I first installed my
vernatherm, then my oil temp probe (using the new gaskets provided in
the B&C kit), and then figured out the orientation of the spacer and
gaskets. I safetied those in place and was ready to install the whole
shebang. Piece of cake.
I then gooped the gaskets with the Loctite 518 (again, provided by B&C
in their kit) and bolted it onto the engine. One of the bolts was in a
bit of a tight spot, but the other three were trivial to get to and
install. I then re-connected the wire to the oil temp probe, moved
where some wires were routed, and was able to avoid changing any wire
lengths or connectors. I lubed the gasket on the oil filter, installed
it, and safetied it. Done deal.
Time : 1.0 hours |
Total Time : 440.75 hours
|
|
![[ The Frye RV-7 Project ]](images/frye_project_banner.png)