|
|
Flap Construction
The ailerons went quick, so now on to the flaps! The flaps are reputed to
be (according both the the Van's manual, and folks I have talked to) the
easiest control surfaces to build. Since the ailerons went so easily, I
hope to get the flaps out of the way in very short order. Lets see how it
goes!
| Started on Left Flap |
August 8, 2004 |
I had a little time left before dinner (and after finishing the last
aileron), so I pulled down the parts for the left flap and started working.
For the most part this means only (a) identifying the parts and (b) getting
the spar deburred. BUT ... its a start. :)
Time : 0.5 hours |
| Left Flap Deburred / Bottom Skin - Ribs Drilled |
August 21, 2004 |
|
We had a big break in working on the plane due to a couple of trips
that consumed weekends (Philadelphia and Theresa's "Bear Hike").
But I'm back at it, and the flaps go fast.
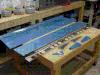
I finished deburring all the edges of the skins and ribs, then assembled
the spar/rib/bottom-skin and drilled. I also fabricated the shims needed
for two of the ribs where they attach to the rear spar, and for the
bottom rear section of the end ribs. Along with all this I positioned and
drilled the hinge. It will need to be trimmed to size, but I can do that
once I disassemble all this for deburring and dimpling. It looks like the
flaps really are going to be quite easy to build.
Time : 2.5 hours |
| Top Skin - Ribs Drilled |
August 22, 2004 |
|
This morning I first put the needed shims in place and drilled the ribs to
the rear spar. I attached the top skin, and drilled the skin to the ribs
and spar. I fabricated the angle bracket, and am ready to attach the end
reinforcement bracket (after I bend it to the precice 6.3 degrees of bend
... yeah .... right).
After a break I bent the reinforcement bracket, and drilled the bracket
to the rib along with drilling it's companion (FL-406A) to the spar. I
primed the brackets and deburred the ribs along with the ribs and the spar.
After some lunch I deburred the skins while Chris countersunk the lower
flange of the spar. I did a little head-scratching on the attachment
of the flap actuator hardware, and realized that I can't (I don't think)
find my CM-4MS rod end bearings. I'll call Van's on Monday and get some
on order (or figure out that something I did see really is something
other than I thought it was). I drilled for the platenut, and attached
one leg to the rib. I riveted (except for where the rib goes) the F-406A
to the spar, and then riveted the center flap ribs to the rear spar.
I also dimpled everything in sight ... skins, ribs, and the flange of the
spar that was not countersunk. This finishes up the parts prep getting
ready for riveting.
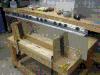
Finally, I build the riveting cradle and clecoed the flap together
ready to rivet. There is no time, as family activities finally call, but
I should be able to finish up this flap this week. That'll be
good because next weekend will be mostly consumed with the trip down
to Southport to look at kayaks. :)
Time : 8.25 hours |
| Riveted Reinforcment Bracket / Started Right Flap |
August 27, 2004 |
|
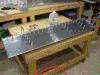
I riveted the reinforcment bracket to the rib, and also set those few rivets
on the end rib that faces inward that I can get to with the bottom skin off.
They are impossible to reach otherwise, and even at that I'm going to have
to use a blind rivet or two.
I also cut the piece of angle for the reinforcement bracket on the right
flap. So ... technically ... I've started the right flap as well. Every
little bit of progress counts!
Time : 0.75 hours |
| Riveted Left Flap / Deburred Right Flap Parts |
September 5, 2004 |
|
This morning I got out the parts for the right flap, and got all the edges
deburred. Chris helped me get the annoying plastic pulled off of all the
parts for the right flaps.
This afternoon Theresa helped me drive rivets on the left flap, and then I
spent the rest of the time squeezing those that could be squeezed. In the
end I had drive the rivets along the top of the main spar, but with access
so open I was able to drive and buck solo. Time to really leap into building
the right flap now!
As a note, Chris also started his new job today. After a little confusion
this morning, things got straightened out and he is off working right now.
I don't know why I note this in the logbook here, but it seems like a critical
milestone to me ... and, one of my better building helpers is going to be
more scarce from now on. So that is the connection. Right. :)
Time : 5.5 hours |
| Drilled Right Flap Bottom Skin/Ribs (etc.) |
September 10, 2004 |
I clecoed the bottom skin, ribs, and spar together. I drilled the ribs
to the spar (front and rear) and fabricated a few shims for the rear spar
where the ribs attach. I laid out and drilled the holes in the reinforcement
piece that I already cut from the AL angle. I bent the other reinforcement
piece to the ever-so-precice (you believe that, right?) 6.3 degree angle
specified in the plans.
Time : 1.25 hours |
| Drilled Right Flap Hinge and Top Skin |
September 11, 2004 |
I positioned and drilled the hinge line on the flap. I then clecoed the
top skin in place (including the shims) and drilled the top skin. That was
all the time I had today, but hope for more tomorrow.
Time : 1.0 hours |
| Drilled Right Flap Actuator Reinforcements |
September 12, 2004 |
Due to some unfortunate events creating significant distractions today I
only got a little done on the flap. I did drill the actuator reinforcement
brackets to the rest of the structure. Left to do is some other minor
drilling and attaching the platenut for the actuator. Priming the
reinforcement components still needs to be done as well. Then it is all
a matter of deburring, dimpling, and riveting. The classic sequence of
assembly events ... and I'll be done with this flap. It is going much
faster (in terms of hours expended) than the first, as expected.
Time : 1.75 hours |
| Finished Drilling Reinforcements / Platenut |
September 15, 2004 |
|
I finished drilling those last few holes on the actuator reinforcements (the
ones which tie the two pieces together), as well as the holes for the K1000-4
platenut. I also drilled the three rib holes which pass through the forward
reinforcement bracket. I deburred the reinforcement brackets, scotchbrited
and cleand them, and primed them (as well as priming the few shims I needed
for this flap).
I also got the flap spar deburred while waiting on the paint to dry, but then
needed to call it a night. This will likely be the last bit of work I get done
until I get back from the trip to San Francisco with Theresa.
Time : 1.50 hours |
| Ready to Drive Rivets on Right Flap |
September 26, 2004 |
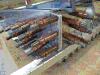
I did all the work needed to get the flap ready for driving rivets. I attached
the actuator reinforcements, the actuator platenut, primed the shims (which I
had missed priming when I did my earlier batch of priming), deburred the ribs
and skins, dimpled the ribs/skins/spar as well as doing the countersinking
on the lower flange of the spar. I squeezed the four 1/8" rivets which attach
the inside ribs to the rear "spar" and squeezed the two rivets I
could get to on the bottom skin at the back of the inboard rib. I'll still
have to use a few blind rivets just because I'm not willing to fabricate
special-case one-time-use bucking bars. :) We are now ready to rivet the
ribs to the skins and finish this flap.
Time : 4.25 hours |
| Flaps Finished! |
October 3, 2004 |
|
The second (right) flap is finished! With help from Theresa today we drove
all the rivets. I used the squeezer where I could (on one end rib, and on
the lower row of spar rivets, as well as one or two other places) but she and
I drove the rest. I cut the hinge pins to length (the right length this time)
and set all the blind rivets. I used the handy-dandy pneumatic squeezer to
get those AD4-6 rivets that tie together the two actuator reinforcement
fittings. I am done with the flaps! Woo hoo!
Time to get back to the
wings, finish up the tank sealing (which .. yes .. I have been putting off
for a while). I have some small odds and ends to finish in the wings (run
some line for the pitot/AOA, install the A/P servo, etc.) and we can start
to close out the bottom skins. Before you know it, we'll be onto the fuse!
NOTE: Don't forget to order a replacement hinge pin when ordering the
finishing kit. That way the pin ... which is long ... won't incurr a high
shipping charge. In fact, I am going to get about 3x as much as is needed
against future need! Done!
Time : 4.5 hours |
Total Time : 31.75 hours
|
|
![[ The Frye RV-7 Project ]](images/frye_project_banner.png)