|
|
Superior Engine Build
This section will detail my experiences going down to Superior Air Parts
to build my XP-360. This is where I'll meet up with the FI unit I built
and take the next step in the story. I'll build the engine and mate the
FI system to that engine, and eventually the whole assembly will come
home with me.
| Dallas Bound / Early Superior Visit |
November 6, 2006 |
|
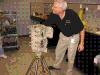
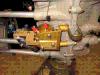
Today I flew to Dallas, and decided to stop in a day early at Superior. I
made a point to not stay long as it -was- early. I met up with Knick
(the salesman who has been so helpful) and Evan. Knick was kind enough to
take me back to the engine build area so I could see that my FI unit had
made it safe and sound. Sure enough when we pull it out of the box it is
MY unit with the flow chart that I drew stuffed in the throat of the
throttle body. Man, it is cool to see that fuel controller down here in
Dallas after all these months! Tomorrow .... we start building. :)
|
| Engine Build, Day 1 |
November 7, 2006 |
|
Today started early. I woke up at 5AM, and could not get back to sleep. I
guess I was excited. :) We met a little after 8AM and had a presentation
about the company, a tour of the facility, then another presentation by
Evan in preperation for the build process itself. We then headed into the
build school room and got to work.
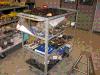
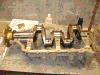
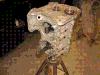
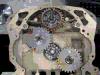
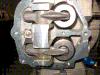
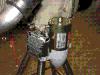
We first had to confirm we all had the right parts (not all did). We then
proceeded to do things like confirm the fit of the camshaft in the case
(making note of clearances), the crankshaft in the case (again taking note
of the clearances), and organizing the connecting rods, installing the
bearings in the case and on the connecting rods, installing various plugs
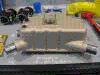
in the case, and eventually putting the crank on the engine build stand.
Somewhere in there we headed to lunch at the Big Bucks Brewry, connected
to the Bass Pros store. A manly-man sort of lunch place. :)
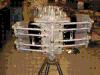
By the end of the day we had installed the connecting rods onto the crank,
checked and lubed everything that needed to be checked and lubed, and we
installed the crankcase onto our growning engine assembly. I don't know
why Evan wanted to pick on me, but I got to apply my own case RTV sealant
and "silk thread". Either would work to seal the case, but the thread
(a seal technique that has been used for decades) backs up the RTV to
insure that no leaks happen.
This was the first class where they had 4 rather than 2 students, so we
ran a bit later than usual. That being said, we still got everything done
today that we needed to get done to be on track. Tomorrow .. we press
forward. :)
Time : 7.5 hours |
| Engine Build, Day 2 |
November 8, 2006 |
|
Once again I woke up at 5AM, and could not get back to sleep. Go figure.
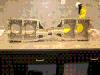
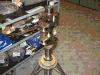
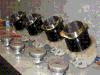
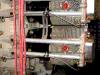
Today we started with the cylinders. We noted serial numbers, lubed the
barrels, pulled out pistons, pulled out piston rings, and learned how to
size (and grind, if need be) the piston rings to fit. I should write the
whole procedure down right now while I remember it ... but I'm tired. :)
Once we got the rings sized right we installed them on the pistons, lubed
them, lubed the connecting pins, and installed the pistons on the connecting
rods. It is a little tricky to do, and requires an _expensive_ tool to
compress the rings while you slide the cylinder on. Once the cylinders
were on, many many deck nuts (of two different sizes) were installed and
torqued.
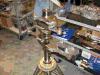
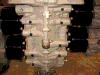
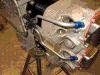
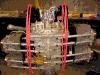
With that done it was pushrod and rocker arm time. We put O-rings on the
pushrod tubes, and installed them. We then checked and lubed the rocker
arms and installed them with their pins in the appropriate locations. With
all that assembled we checked the dry tappet clearance and were done.
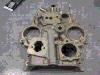
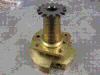
With that out of the way we started assembly on the accessory case. We
pulled the parts for the oil pump, inspected and lubed them, and installed
them in the accessory case. We also installed the fuel pump drive pin,
and did initial fitup of the governor adapter. Finally we installed all
the valve covers, the oil pressure valve, and the inter-cylinder baffles.
I have to say I'm really pleased with my luck on drawing parts. I got
connecting rods that were the same weight within a gram on day 1, and
then got pistons that were the same weight within a gram on day 2. It
is my expectation that this is (for a a Lycosaur-alike engine) going to
be a smooth running engine. :)
Time : 8.0 hours |
| Engine Build, Day 3 |
November 9, 2006 |
|
Today I was able to sleep to .. *gasp* .. 6:15AM. Better than nothing. :)
We launched right into building on the engine, and were deep into getting
things wrapped up. Due to having four different engines under construction
at once ... things started to bog down a bit. Evan worked hard to keep us
all moving, and all informed of what we should be doing, but suffice it
to say that he could not keep moving fast enough. Four is just too many
engines in one build school _without_ some significant full-time help
for Evan. Period. We did have some part-time help from another extremely
talented engine builder on staff there, Able. He was always happy to step
in and lend a hand.
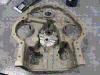
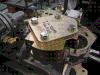
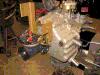
Today we finished up installing the parts in the accessory case (oil pump,
fuel pump, etc.). We installed the drive gear on the mags, and installed
the mags on the accessory case. We installed the starter, the oil filler
tube, the oil screen and plug, and launched into the installation of the
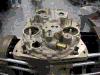
fuel injection system.
As it turns out they install very few Airflow Performance systems there,
and I'm not sure Evan has ever installed a vertical induction API system.
So I was somewhat on my own. Thank _goodness_ that I had spent the time
I did down at API and was fairly familiar with the system. Even so I had
to stare at the install manual a bit to be sure I was "doing the right
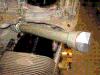
thing". When it was all said and done we had installed the fuel controller,
the fuel and mixture cable brackets, the flow divider, and the fuel
distribution lines. Evan showed me how to route the first one, and I
did the remaining three. Oh, and obviously we installed the injector
nozzles as well.
*whew*
Due to the large number of engines going at once, and due to the fact that
some systems (the API system, and some aspects of the Lasar installation
on another builder's engine) were not as familiar to Superior, things ran
late. Even so Evan and the folks at Superior provided a ... dare I say it?
... superior experience. :)
Time : 7.5 hours |
Total Time : 23.00 hours
|
|
![[ The Frye RV-7 Project ]](images/frye_project_banner.png)