Fuel Tank Construction
Tank construction has started and is off and running well. I intend to use the
Dan Checkoway tank assembly sequence
in constructing my tanks. His flow of work went great and resulted in
a good fit .. and it seems others have had similar luck.
While I'm trying to build both wings at the same time, I'm thinking that
I will have to build one tank at a time. The problem is that I have just
enough clecos to have two wings clecoed, two leading edges clecoed, and
one tank. :) Trying to beg/borrow/steal enough additional clecos just
does not seem worth the effort. One tank at a time should be fine, as long
as I do the two back to back.
| Started on Right Tank |
July 4, 2003 |
|
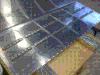
Ribs straightness and fluting
were checked and then Christopher and I clecoed the first tank together.
Pulling them together is a bear since the skins are so thick and
stiff. Additionally, the end ribs are thicker as well which adds to the
difficulty when pulling them in place. Still, we got it done.
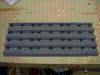
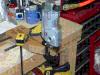
After the tank was clecoed I started work on the Z-brackets. I deburred
the edges and measured for the first middle spar-side hole. I then made
a quick jig (with a chunk of 2x4, some C-clamps holding it to the drill
press, and some sharpie marks) for drilling. This let me measure once
and then for all the rest of the brackets (except the two inboard Z-brackets
which need to be drilled a little differently) I could just toss
them up on the jig, clamp them to the 2x4, and drill.
I've already started to match-drill the brackets to the spar but after
the first two it was time to start the grill for the brats. :)
Happy 4th of July, everyone!
Time : 3.0 hours |
| Drilled Tank Z-Brackets |
July 5, 2003 |
|
While waiting on the family to get ready to go out today I drilled
the rest of my right-tank Z-brackets. I'm being nagged by the family
to get up and head out the front door now so I'll cut this entry short!
Suffice it to say that the match-drilling is going well. :)
After our outing today (and while waiting for dinner) I spent a little
more time drilling the Z-brackets for the left tank. I figured that while
I was doing that particular flavor of operation I might as well get all
of the brackets done!
Time : 1.25 hours |
| Drilled Tank Z-Brackets |
July 6, 2003 |
|
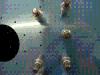
Another day of doing lots of little steps. Today I drilled the nutplate
rivet holes in the z-brackets. I used a nutplate that I ran a 10-32 tap
through to make it screw onto an AN-3 bolt easily. (That nutplate is now
a throwaway 'cause in running the tap through the self-locking capability
of the nutplate was compromised badly!) I then screwed the nutplate onto
the z-bracket and used the ears as a drill guide. Lots of tedious little
steps, but not a bad job given I had NPR going on the radio.
I then countersunk the rivet holes for the nutplates. Again, a tedious
job with lots of little steps but not bad once you get in the groove. :)
I also used my electric scriber to etch the location for each z-bracket
so that when we cleaned and alodined the brackets we could still figure
out where they belonged.
Finally, with Theresa's help I alodined the z-brackets. We cleaned off
the sharpie marks, scuffed with Scotchbrite, and alodined. It went
pretty fast and in fairly short order (after we ate dinner) they were
ready to be primed. Sooooo ... I primed them. I'm ready for the final
step in fitting the tanks but will leave that until the next session.
Time : 3.5 hours |
| Installed Platenuts on Z-Brackets / Cut Out Stiffeners |
July 9, 2003 |
|
When I got home from work Christopher was installing platenuts on
the Z-brackets. I had shown him what needed to be done last night
and he did some independent work today. Way cool! What a kid! :)
While he finished that up I snipped out the tank stiffeners. They
still need to be cleaned up on the Scotchbrite wheel but that'll
be pretty quick work when I get around to it.
Time : 1.25 hours |
| Installed (Temporarily) the Z-Brackets and Right Tank |
July 12, 2003 |
|
I finally got some 10-32 cap-head screws so I don't waste my AN hardware
temporarily installing the Z-brackets. I didn't want to have to worry
about exact torque values! It was just very slow running all those
bolts through those stubborn platenuts.
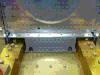
I installed the brackets on both wings, just to have that job out of
the way. I also installed the platenuts for the inboard bracket (which
has the platenuts mounted on the front-side of the spar) with pulled
rivets. I decided that all the rivets did was hold the platenuts handily
while the bolts are out and riveting between those close spaced ribs
risked me banging the spar reinforcements and it didn't seem worth it
just to install solid rivets.
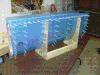
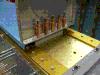
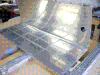
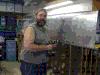
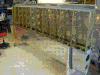
We then set the tank up on the spar and the fit is fantastic! You
can see the results in the pictures here. There is NO gap between the
tank and the leading edge!
Time : 2.5 hours |
| Touched the Project (Scotchbrited Tank Stiffeners) |
July 21, 2003 |
|
It has been a crazy few weeks with having some sort of bug (that seemed
to be going around), a party one weekend, and out of town the next. As
you can see I have not touched the project since the 12th!
Even tonight I'm kinda tired from the wonderful weekend away last weekend,
but wanted to "touch the project" just to remember how it feels
to work on it! I didn't want to do anything that being tired would really
screw up ... so I Scotchbrited tank stiffeners. There are a bunch
of them, too. Got them all done and am now going to go get a bite to
eat. :) Hopefully tomorrow night I'll have recovered even more and can
get back to the main activity of getting that first tank fitted.
However, this just goes to show that you should always have some small
side-task to do just in case you hit a night when doing "big stuff"
just isn't in the cards!
Time : 1.25 hours |
| Drilled (Mostly) Right Tank |
July 22, 2003 |
|
I drilled the right tank rib-to-skin rivet holes, avoiding drilling the
skin-to-baffle holes because it is too easy to accidentally drill the
spar doing those while mounted. DRILL THE SKIN-TO-BAFFLE HOLES WHILE
NOT MOUNTED ON THE SPAR! Thankfully I remembered and didn't make a mistake
myself. I also drilled the #19 holes through the tank skin into the
join plate which goes between the tank and leading edge skins.
Once the rib-to-skin holes were drilled I drilled the exposed inboard rib
to Z-bracket and clecoed it in place. I then pulled off the leading edge and
this exposed the outboard rib and Z-bracket letting me drill them as well.
I then removed the tank skin and ribs ... leaving the two outboard ribs
clecoed to their respective Z-brackets.
This arrangement left me with wide open access to the rest of the Z-brackets
and I drilled them as well. I then pulled the rest of the tank parts off
of the spar and reassembled the tank in the cradle. This allowed me to
drill the skin-to-baffle holes (safely away from the spar), thus completing
virtually all of the drilling needed for this tank.
Time : 2.25 hours |
| Finished Drilling Right Tank / Started Deburring |
July 23, 2003 |
|
I finished drilling the right fuel tank. This included drilling
the tank-to-spar screw holes. I also started doing a little deburring
on the right leading edge. That is all the time I had before we had
to head out for the evening ... but a little work done is better than
no work done at all!
I'm going to pause on tank work now to go finish the right wing leading
edge. That way I can get it clecoed on and off the work bench making
room for other parts. Trying to build two wings at the same time is an
exercise in space management .. for sure!
Time : 0.75 hours |
| Started Fabricating Tank Attach Brackets |
August 30, 2003 |
I needed something simple to do as I was a little under the weather over
the labor day weekend. Doing the cuts and shaping on the brackets seemed
a good activity. I had cut the sections out of the angle stock on Marilyn's
metal bandsaw, and then used the die grinder to cut off the bulk of the
material to rough shape the outward-facing flange of the bracket. I then
used my disk sander to further shape the flange, and finally my Scotchbrite
wheel to clean it all up. I'm not completely done, but have made a good
start on these parts and am pleased with how the shaping is coming along.
Time : 2.5 hours |
| Clecoing Left Tank |
September 6, 2003 |
While waiting for some charcoal to get ready for dinner ... I did a little
more shaping of the tank attach bracket. I now have the flange which sticks
out from the tank finished for both tanks. It looks *quite* nice. Once I am
done drilling both tanks (I'm about to work on the left tank now) I'll make
a pattern for the nose rib for the other flange.
Time : 0.25 hours |
| Clecoing Left Tank |
September 7, 2003 |
|
It was time to do the much hated first cleco-ing of the tank. These ribs are
really stubborn, and much sweat is generated getting them clecoed together
for the first time. Once they are drilled it isn't so bad, but this first
tight fit is really tough.
I had to pause with two ribs left. Earlier today we had to dig (and transport
via wheelbarrow) a mound of dirt. I hurt .. and more specifically, my back
hurts! Bending over to cleco finally did it in and a break is now called for!
Since I didn't want to quit working, but couldn't bend over to cleco any
longer, I did some general shop maintenance. Things like dragging my air
compressor outside to drain accumulated water from the tank, and other small
jobs that I always put off doing. :)
Time : 1.5 hours |
| Clecoing Left Tank (Finished) |
October 2, 2003 |
|
Ok ... you might wonder why a month has gone by with those two ribs still
not installed. Along with many other things we had a hurricane (Isabel),
went to the beach, had to deal with beta-release-madness at work, spending
some of my Saturday free time helping out at the flying club, building a
sewing table for Marie, taken kayaking lessons (and decided to put kayaking
on hold until next spring) and a whole host of other things. I don't begrudge
any of these activities (except for Isabel, actually) but they have taken
my time.
Tonight Tom comes by to take a look at an issue I have on the wing, and I
do dearly hope he doesn't have anything too bad to say! (NOTE: Tom
gave me a clean bill of health. He said that the progress is looking good
and he is happy to give me a sign-off for this inspection!)
Time : 0.5 hours |
| Drilled Left Tank and Z-brackets |
October 4, 2003 |
I got a lot done in a short bit of time ... it helps that this is the
second round of doing this work. I drilled the tank/rib holes, and the
tank/z-bracket holes. Once I pulled the baffle back off I drilled any
and all holes (including all the baffle holes, which are risky to drill
while clecoed on the wing due to the high opportunity for drilling into
the spar) which had not yet been touched. I also pulled the join plate
out and got it deburred and scotchbrited ready to be dimpled and to have
the platenuts attached. Progress!
Time : 2.0 hours |
| Tank Stiffener Work |
November 28, 2003 |
|
Now that the top skins are on the wing (see the wing section) and the
QB fuselage is delivered (see the fuselage section) it is time to get
back working on the tanks.
Today I sorted the tank stiffeners into two groups ... one for each
tank. I also used my soft Scotchbrite wheel on the die grinder to
polish the edges of the stiffeners so they weren't so rough. Much
nicer now!
Christopher and I drilled the stiffeners to the right tank skin and
then he set into deburring everything on that tank. He got all
sides of the skin done as well as all the stiffeners, but we got
distracted (on a Lowe's run) before he could get further.
As for me, I worked on shaping the right tank attach angle. If you look
above you'll see that I got the easy side done, and now was shaping the
portion of the angle that fits into the nose of the rib. Partway through
I realized that my abrasive disk on the disk sander was shot ... which
meant a run to Lowe's (the distraction mentioned in the earlier paragraph).
When we got back I finished up the angle, but Chris was tired of deburring
so the ribs are left 'til tomorrow. Still, we got a good bit done today
considering I seem to have picked up some cold bug! *grumble*
Time : 2.5 hours |
| Right Tank Prep Continued |
November 29, 2003 |
|
Theresa spent some time deburring the ribs, and then the baffle plate. I
pulled off the blue plastic from the skin, deburred the edges of the skin,
and started countersinking the skin/baffle rivet holes. Getting that plastic
off in the cold this morning was made a lot easier after facing it at the
propane heater in the shop for a few minutes! Not so close as to actually
get even remotely hot ... but at least a little warmed up from being
absolutely frigid.
After lunch I finished up the countersinking on one side of the tank skin
(tedious and tiring, given how I'm doing it) and pulling the conduit through
the left wing (another tedious job, time logged under the Wings section).
I'm still wrestling with
a slight cold so spent the afternoon mainly watching my IFR ground school
and didn't get nearly as much plane work done as I could have. Oh well.
(Yes, I'm insane not only flying while building, but adding on an IFR
rating as well.)
Time : 1.5 hours |
| Left Tank Prep |
November 30, 2003 |
|
Theresa spent an our disassembling the left tank, marking the ribs,
and deburring the ribs and baffle. While she did this Christopher and
I took the crate parts (plywood, 2x4s, metal bands, paper) to the dump.
Always fun, ya know.
I pulled the plastic off of the left tank skin while taking breaks from
finishing countersinking of the baffle/skin rivet line on the right tank
skin. Given how it is done I have to take regular breaks, so pulling
plastic is a no-brainer job to do while waiting for my shoulder to stop
hurting from the countersinking! :)
Theresa tackled the job of deburring the left tank skin. That took
a little bit. I worked on drilling the one tank attach bracket that was
already finished, and then finishing and drilling the other tank attach
bracket.
Finally, I spent a little time deburring the left tank stiffeners. With
that done, the next thing to do on the left tank is to cut the countersinks
for the baffle/skin rivets.
Time : 4.5 hours |
| Left Tank Countersinking |
December 3, 2003 |
|
I spent a little time starting on the countersinks for the skin/baffle rivet
holes. I'm still a little under the weather so mainly showed Theresa how to
do it ... and did a few myself.
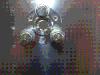
Also as an experiment (and not counted in any logged time) I took a bit of
scrap aluminum bar and practiced polishing it. Running from 250 grit to
600 grit I sanded the bar .. and then finally hit it with the polishing
compound on a buffer mounted on my bench grinder. For a quick experiment,
it came out great! The goal is to polish my fuel caps, and when I
do them I'll likely start with a rougher grit at the start, and will go
up to 1000 grit in the end before polishing on the buffer. Should turn
out fantastic!
Time : 0.5 hours |
| Left Tank Countersinking (again) |
December 4-5, 2003 |
Theresa cut loose a spare few minutes to do some countersinking on the
left fuel tank skin each day. Fifteen minutes a day isn't much, but every
little bit helps .. and surprisingly enough it moved things along nicely!
Time : 0.50 hours |
| Tank Progress |
December 6, 2003 |
|
I finished the countersinks on the left fuel tank skin, drilled the T-410
stiffeners to their respective ribs (drilling the ribs at the same time
as well). I also cut the anti-rotation brackets, cleaned them up on the
Scotchbrite wheel, and started to drill the holes for the fuel fitting.
It was then that I discovered that I didn't have a 9/16 drill bit! Off
to Lowe's it is, then.
I also discovered that I had the T-408 tank cover plates when what I really
need at the T-411, it seems. The float style fuel senders get mounted onto
the T-408 if you are using that style sender, and therefore there are a
number of holes in that cover plate that are rather useless to me! This
was a simple mistake at Van's since I did order the capacitive fuel senders
when I ordered my wing kit ... so they should have known. I'll fix this up
on Monday and until then work on what else I can. There is plenty to do,
ya know. :)
Time : 4.25 hours |
| More Tank Progress |
December 7, 2003 |
|
Today was a collection of more tank prep work. I drilled the fuel cap
flanges for both tanks, drilled the fuel drain flange for both tanks,
and drilled the #19 holes for the tank/spar screws in the right tank skin
as well. I then cut the countersinks in the fuel cap flanges and fabricated
the vent line retainer clip for both tanks.
I also created the dimples for the #8 screws on one of the tank skins. At
that point it was getting rather cold and I was getting rather tired. Aside
from airplane work ... there *was* other stuff to do today, and it all
added up to me being bushed by dinner time.
Time : 4.0 hours |
| Started Dimpling Tank Skins |
December 26, 2003 |
You might wonder why there was the sudden big break in progress. As it
turns out, the middle of December was insanity on multiple fronts. However,
Theresa (not me!) finally got some time after the Christmas craziness
calmed down and did some dimpling on the tanks. Wonderful. After I get a
few other items off my plate I'm getting airplane work done over the
holiday too! *whew*
Time : 1.0 hours |
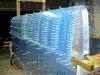
| Set Up Stiffener Dimpling Station |
December 28, 2003 |
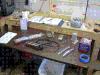
I took a few minutes out from the family visiting to pull together an
idea I have had about making a stiffener dimpling station. I only had a
few minutes, but this was so dirt simple that it only took a few minutes.
Look at the picture to see the setup (picture to come soon). It allows
me to sit there and quickly (and comfortably) dimple the large pile of
tank stiffeners I have to dimple. Sometimes it is the simple solutions
that are so satisfying. :)
Time : 0.25 hours |
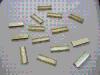
| Dimpled Tank Stiffeners |
December 29, 2003 |
|
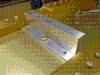
Ok .. ok .. I know I was supposed to work on the plane today. Instead I
got distracted by the dearth of what seemed to me to be reasonable yoke
clips for instrument approach plates. So I made one. I'll include a
picture here ... just so you know how I spent my day. It did NOT take a
day to fabricate it, but it did take the morning to puzzle through how
I wanted to build it, throw out some ideas because the materials I wanted
to use were not available (not handily enough, at least) and driving
around designing as I walked through various stores. The fabricating
took all of about 2 hours ... once I had it all figured out. This is
the Mk 1 version, warts and all. If it works out I now have the material
to make about four more. Want one? :)
Oh .. yeah .. and I dimpled my tank stiffeners, too. That is the only
shop time I could actually log today!
Time : 0.50 hours |
| Capacitive Fuel Senders |
December 30, 2003 |
I spent the morning working on positioning, drilling, and installing
platenuts on the capacitive senders. It is finally time to open up the
black goo ... so I can use it on some of the wire connectors. We'll
see how that goes. This is the last bit of building in 2003, as I know
I'll be too busy tomorrow (New Year's Eve) to get anything done! On
to 2004 and more progress!
Time : 2.5 hours |
| Capacitive Fuel Senders / Inboard Tank Rib Prep |
January 16, 2004 |
|
Ok, the beginning of the year has been a bust as far as working on the
plane goes. We have just been either too busy, or it has been way too
cold, to get any work done. Oh well.
Now, back to working! I soldered one capacitive sender wire to the BNC
connector, and crimped/soldered the other wire to a ring terminal. I also
very carefully set up the fly-cutter and cut the large access holes in
the inboard tank rib. I used the T-408 to determine where the fuel line
hole should go in my T-411, and also did some drilling on some scrap to
determine how large a hole I needed for both the fuel vent line AN fitting
as well for the BNC connector.
This all took so long (3 hours!) because I was continually having to
get out stuff I've not used in ages, or making other changes. For instance,
I had to change the chuck on my drill press to my old larger (but not
zero closure) chuck, had to remember how my terminal crimper worked, had
to drag out my Weller soldering station, etc.
Time : 3.0 hours |
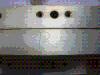
| More Inboard Tank Rib Prep |
January 17, 2004 |
|
Today I continued work on getting the inboard tank ribs ready to go. I
drilled the holes for both the capacitive sender BNC bulkhead connector,
the tank vent line AN fitting, and the fuel line AN fitting. I also had
to drill the two #30 holes for the anti-rotation bracket. These holes in
the tank cover plate (for me, a T-411) were not predrilled since this part
is designed to accommodate both capacitive sender installation as well as
the flop tube. I've decided to skip the flop tube after all, so had to
install the holes for the standard fuel pickup.
I also drilled the #8 screw holes for the cover in the rib, as well as the
holes for the cover reinforcement ring. This included all the #40 holes for
the platenuts that go into the reinforcement ring. If I had not gotten to
the point where my feet were killing me from standing on concrete, I would
have done the dimpling/countersinking for those rivets as well. Oh well,
gotta leave something for the next session! This means I'm getting really
close to not being able to put off the proseal activity any longer! Woe
is me. :)
Time : 3.5 hours |
| More Tank Prep |
January 24, 2004 |
|
Today was blissfully warm (in the 50s) so working in the shop was a real
treat (compared to what it is going to be like tomorrow .. in the 20s!).
I countersunk the tank reinforcement rings, dimpled the ribs, and then
clecoed (with Christopher's help) and riveted the platenuts on. This took
a wile ... there are a lot of holes ... but I got it done. I also drilled
the rivet holes in the anti-rotation brackets.
I then pulled out the fuel pickup tube and cut it in half. I flared one
end and used my new tubing bender to bend it roughly to the right
angle. I'm going to wait until final fitting to cut it to size and finish
the far end.
Aside from finishing dimpling the tank skins, I've done about all I can
without messing with the "Black Death ™". Maybe if it is
not too freezing tomorrow .. I'll get into that bucket of fun. :)
Time : 3.75 hours |
| Finished Tank Dimpling |
February 1, 2004 |
|
Theresa had dimpled the bottom side of the left tank already, and I had
dimpled the #8 screw dimples. That left half of a skin and another whole
skin to dimple. It is amazing to me how long it takes, but virtually the
whole time was spent today on the dimples ... with a little work on reworking
the flair on my fuel pickup tubes.
You see, I did the flair and bend before putting on the AN nut. The nut
itself was no problem, but the bushing .. well .. it would not go past the
bend. Given that I felt the distance between the top of the flair and
the bend was too long anyway ... I cut it off, slipped on the bushing,
and re-flared the tube. Problem solved.
Note to self: Always remember to fit the AN fittings BEFORE you do the
flair so that you can actually get the buggers on when the time comes!
Time to go watch the Superbowl now. Go Panthers! (Not that I'm a huge fan,
but what the heck .. gotta root for the "home" team. Right? *grin*)
Time : 3.25 hours |
| Prosealed Fuel Pickup / Capacitive Sender Wires |
February 7, 2004 |
|
This is my first round of "fun" with Proseal. It went well
enough, but I had an alignment problem with one of my anti-rotation
brackets and riveting was not possible. I had to adjust it a bit which
meant MEKing the proseal back off .. working on the part .. and doing
it all over again. *groan* Not fun. Once I was done I had polished off
my box of latex gloves and lots of paper towels. That being said, I
learned a bit about working with the stuff and am glad my first round
was a simple/small one. It'll go better next time. :)
I did get the fuel pickup fittings in place, prosealed, with the anti-rotation
brackets in place and prosealed as well. I used some left over proseal to
cover the wires already attached to the capacitive sender plates.
Time : 2.25 hours |
| Prosealing Tank Stiffeners / Filler Ring / Sump Drain (Left) |
February 8, 2004 |
|
With a lot of help from Christopher we got the stiffeners, filler ring,
and sump drain done on the right tank today. There isn't much to say that
hasn't been said ... proseal gets *everywhere* if you are not careful, have
lots of gloves and paper towels at the ready.
I made a point to scuff the areas to be prosealed with my Scotchbrite
pads, and then cleaned with MEK. I cleaned the rivets with MEK as well.
I got everything as squeaky clean as possible, then did NOT touch it
again. We'll see how it goes when time comes to leak-test.
I did use the proseal
cartridge gun that I purchased off of eBay, and it was fantastic! The
little cartridges are expensive, but I'll be buying a couple more to
finish off the tanks. I will tell you, though, that one 6oz cartridge
goes a LOT further than you might expect. We did everything today and
had a good third of the cartridge left (unfortunately, since after it
is mixed it'll cure and can't be used again).
Time : 4.5 hours |
| Prosealing Tank Stiffeners / Filler Ring / Sump Drain (Right) |
February 14, 2004 |
The previous entry might as well be copied here with only a few
differences. This time it went faster, even though this time we had
a few rivets to drill out. I also used a good bit more proseal this
time around ... and have no clue why. Even so, the gun was once again
a real win! Oh, and my helper today was Theresa, and a great helper
she is too!
Time : 3.0 hours |
| Misc Tank Rib Prep |
February 15, 2004 |
This morning as I was thinking about what to do next I realized that I
had not yet dimpled the tank ribs! I knew I was going to get around to
it some time .. so today was the day. I also "fabricated" (if
you can really call it that) the little plates to put over the tooling
hold on the inboard rib, drilled the plate to the rib, and then riveted
and prosealed it in place. I also double-checked the various tank rib
reinforcement plates to insure they were ready to go, and Scotchbrited
the rib flanges as well as the place where the reinforcement plates will
be installed. The morning was spent, sadly, in a lengthy quest for
propane for my space heater ... else I could not have worked out in
the very cold garage much at all today! Fortunately, I did find some
propane and Mr. Heater was back in action again today.
Time : 3.5 hours |
| Started Clecoing the Right Tank |
February 21, 2004 |
|
We are having a party tonight, so there was very little time to work
on the plane. Furthermore, I'm in the final segment of working on my
instrument rating ... and it is likely the case that I won't get much
work done on the plane for a few weeks.
However, I had to touch it a bit, so did get three ribs clecoed
into the right tank. This is in preparation for riveting and prosealing
the tank ... which we'll get to eventually. :)
Time : 1.0 hours |
| Finished Clecoing Tanks for Riveting |
March 13, 2004 |
|
Ok ... it has been a long silent break here, mainly because I'm trying
to finish up my instrument rating. Why I elected to fly, train, and build
is beyond me. Not a bad thing, but tough. My instrument written is behind
me now (successfully!) and I'm back to building.
I clecoed the rest of the tanks together to hold them straight for the
riveting sessions. I'll be pulling ribs out as I go to make room but the
tanks will be held fairly rigid by the other ribs which will be in place.
Time : 1.5 hours |
| Riveting Left Tank |
March 14, 2004 |
|
Getting ready took a bit of time, what with mixing the proseal, getting
out all the tools, setting the air pressure and checking the gun, and
all the other little steps. Since this was the first rib prosealed in place
we wanted to go slowly and make sure nothing was forgotten.
Still, something was forgotten. On the first rib we neglected to do the
few turns with the deburring tool to help the rivet seat well. If you look
very carefully you'll see that the rivets sit slightly proud. Oh
well ... for the rest of the ribs we'll give a few turns with the debur
tool and then clean before we proseal. (We don't want metal shavings in
the mix here!) Rib one is done and we are now obligated to go do lunch
with the family. Once we come back we are going to finish this tank
today ... at least those ribs which have to have their rivets driven.
[ Out to lunch ...]
We are back from lunch and have gotten another pair of ribs driven in
an hour and a half. It is slow, messy work .. but we are getting there.
Now we have to break for some more family time, and I hope my Proseal
cartridge holds up 'til we get back!
[ Time passes ... ]
The Proseal cartridge did hold up ... but just barely. We can't allow quite
so many breaks in the process next time. However, we got all the ribs that
needed to be *driven* (that is to say, the inner five) done. Still left to
be done is adding a "fillet" of Proseal along the rib flanges and
adding spots of Proseal on the rivet shop heads. Easy enough to do the next
time we rivet.
Time : 5.5 hours |
| More Tank Work |
March 27, 2004 |
|
More breaks in working due to finishing up my instrument rating. No, I have
not made it out for my checkride but we are getting there. Also, Theresa (who
is one of my major building assistants) has not been able to get out into
the shop so things have been delayed ... again.
Today was an exercise in fixing up problems. I drilled the wrong ribs for
the fuel senders, and had to re-drill the right ribs. I also put the clip
for the vent line in the wrong place and had to move that. None of this was
a big deal, but it did take time. All fixed now, and I'm moving forward.
I cut my vent lines and have them ready to install. With luck I'll make even
more progress tomorrow! :)
Time : 3.25 hours |
| Yet Again More Tank Work |
March 28, 2004 |
I installed the vent line, one of the fuel sender plates, snaked the
wire from that plate through the snap bushings, and installed and sealed
one of the end ribs. There should be more to write from all the work,
but that really sums it all up well enough!
Time : 4.5 hours |
| Inboard Fuel Sender Plate Installed |
May 23, 2004 |
|
Installed the BNC connector into the end rib, snaked the wire into
where the inboard sender plate resides, crimped the connected onto
the wires and installed the connector onto the plate.
April (and much of May) was a dead loss on airplane building due to finishing
my instrument rating, going to Sun-N-Fun, going to San Jose for business,
and a host of other activities. I'm back at it now, though. :)
Time : 2.5 hours |
| Left Fuel Tank (Mostly) Finished |
May 24, 2004 |
|
I'm back working on the plane with a vengeance now! Today I had help (lots
of it!) from both Theresa and Chris. Thanks guys!
We installed the inboard fuel sender plate, the inboard rib, the vent line
fitting, riveted the rib, riveted the tank attach bracket and reenforcement
plate, attached the vent line, and pro-sealed the BNC connector for the fuel
sender.
The only thing left to do at that point was to install the back baffle, and
(except for the lower line of rivets) that is what I did. I used the pop
rivets as recommended and the Z-brackets went on with no trouble at all.
Sure seems like I should have more to write, but it takes a LOT of time to
do all this given the number of rivets, the annoyance of the pro-seal on
everything, and the ongoing cleanup needed as clecos and tools get
coated in pro-seal. Yuck.
I ran out of time (and energy!) today so the bottom line of baffle rivets
will have to be installed later this week. After that I'm going to give it
some time and then once the pro-seal has had a good chance to cure I'll
leak test the tank (please please please let it not leak!). :)
Time : 8.0 hours |
| Finished Left Fuel Tank |
May 25, 2004 |
After working late on "real work" I went out and set that
last row of rivets. This was the line on the bottom of the back
baffle. The left tank (other than leak testing and fixing any
problems found) is done!
Time : 1.5 hours |
| Preped for Leak Test |
May 29-30, 2004 |
|
I spent a little time over the holiday weekend (when I didn't have other
commitments) preping for the leak test. I realized that I had made one
small mistake by installing the screws on the tank access cover with only
fuel lube ... and then upon reading the directions again discovered that
I really should have used pro-seal (and should have realized this without
the directions!). So, I pulled out the screws one at a time, cleaned them
in MEK, and then reinstalled them with a dab of pro-seal. It made a nice
little "gasket" around the head of the screw but I had to let
this all cure before leak testing.
Also, I realized that just sticking the 1/2 inch tubing I have over the
vent line would NOT seal adequately. The threads would let air out so I
need to create an adapter with some flared tubing that I can put on the
vent line. Then the plastic tubing can go over the smooth aluminum tubing
and make a good seal. Then ... the moment(s) of truth. The leak test. :)
Time : 2.0 hours |
| Right Tank Outboard Sender |
June 2, 2004 |
I had mis-drilled the holes to attach the outboard fuel sender, so I
took a little time to fix them tonight. I wanted to have everything ready
for riveting on Saturday. I have a little more to do (need to fabricate
the vent line, and final fit the fuel pickup tube) but we are essentially
ready to go.
Time : 1.0 hours |
| Right Tank Interior Ribs Installed |
June 5, 2004 |
Theresa and I (as planned) installed and sealed the interior ribs in
the right tank. I'd say more, but you have heard it all before. :)
Time : 4.0 hours |
| Right Tank Work Continues / Left Leaks Sealed |
June 13, 2004 |
|
The left tank did not end up being leak free, so today I tried
to seal the spots that were leaking. There were three .. the BNC connector,
and the two bottom rear corners. At first I thought that the outboard
leak was going to be a nightmare to fix, then some kind RV-lister pointed
out (off list) that I could get to that spot through the filler hole. Why
didn't I realize that sooner?? I put an "extension" onto my
Semco nozzle, reached down to the corner, and applied a lot of goo right
on the bad spot. I took a stick and pushed it around to make sure the hole
was filled. I also took off the access plate and put proseal on the other
corner, and on the BNC connector. I've got to let it cure a while before
I leak-test again .. but all in all I feel pretty good. We'll see once
those big leaks are taken care of whether there are any little ones.
I also did some additional sealing of the ribs on the right tank, installed
the vent line, installed the fuel senders, and riveted on the outboard rib.
It took a lot longer to do than to type up this entry ... and it is somewhat
frustrating that hours of work can be distilled into two lines of logbook
entry! Oh well. :)
Time : 5.5 hours |
| Right Tank Closed Out (Almost!) |
June 20, 2004 |
|
Today I riveted (and sealed) the inboard rib and the back baffle. I ran out
of blind-rivets (AD-42H) for the Z-brackets!! Damn! All I need is five of
them, but putting on the last Z-bracket will have to wait. Also, like the
other tank I'm waiting to actually install the skin/baffle rivets (only
because I'm exhausted, though).
I should be about done with Pro-seal, however. I need a little for the
last few blind-rivets, and a little for the cover plate screws, but that
SHOULD be it (assuming no leaks, of course).
Time : 5.75 hours |
| Right Tank Closed Out (More .. but .. ) |
June 26, 2004 |
|
I got some time today to do most of the rest of the closing of the
right tank. I riveted on that last Z-bracket, realized I put one of
the end ones on wrong (dang!!), drilled it out, reattached it the
right way, fabricated the fuel pickup line, and installed the tank
access cover. I still need to install the skin/baffle rivets, but an
evening of tedious work will see that completed. If we weren't going
to a party in about 20 minutes, it would get done today!
I also re-installed the tank access cover on the left fuel tank, so
as soon as the proseal is cured ... we can leak test it again.
Time : 2.5 hours |
| Right Tank Baffle Rivets |
June 27, 2004 |
|
This morning I spent some time riveting the skin/baffle line and got
the bottom side completed. Tedious, mainly because of needing to clean
the dried proseal from the clecos as I went.
After lunch Theresa and I jumped into doing the top size set of rivets
and with two people it went twice as fast. Not all jobs divide so well
but this time we did double the speed. The second set took only an hour.
Time : 3.0 hours |
| Left Tank Re-sealed (again) |
October 4, 2004 |
I long ago found I *still* had a two leaks in the tank, only noticed
once the other few were sealed. Today, after a long delay (avoiding
ProSeal for a bit, frankly) to build the ailerons and flaps, I mixed
up some ProSeal and sealed the two latest problems spots. I now need
to let that cure, and then we'll leak-test again. I also need to do
the first round of leak testing on the right tank. Now that the ailerons
and flaps are done, there is no longer any excuses to avoid finishing
the tanks. :)
Time : 1.0 hours |
| Both Tanks Tested (Left Still Needs Work) |
October 9, 2004 |
|
I leak tested both tanks, and realized that I had mis-remembered where
one of the original leaks was on the left tank. Doh! :) So I reached into
the filler hole with a long stick with proseal on the end, and sealed the
right spot. I also added some sealant on the outside. The other
spot that leaked (the top-rear corner on the inboard rib) seems to be
sealed fine now though.
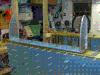
In leak testing the right tank, the only place I got bubbles from my soapy
water were the duct tape on the tank filler hole, and the duct tape around
the balloon/tubing off the vent line. The balloon blew up nicely (but not
a LOT, as I don't want to stress my tank too much). I think this tank is
good to go! Wonderful!
Time : 2.0 hours |
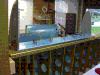
| Right Tank Mounted |
October 10, 2004 |
|
With the right tank good to go, I mounted it onto the right wing. I did a
number of other things on this date (go see the Wings section) which is why
this is such a brief little entry. I racked up so much time because of my
setup. I had saved a stubby part of one half of my wing stand just for this
occasion. I clamped it to my bench which had the parallel supports right at
about 109" apart ... perfect for hanging the wing back up again. Once I got
them clamped up, I drafted my son and we put the wing in place.
The other thing that slowed me down a little is that the tank is such a
tight fit that I had to do some fitting. I had to take a file to the
outboard end of the tank skin where it mated with the leading edge skin to
get the fit just right. I also had to make myself a homebrew "drift
pin" from an AN3-32A bolt. :) A little quick work on the bench grinder
and Scotchbrite wheel created me a pin I could use for those fine adjustments.
Even so, I only needed it in 2 or 3 places to pull the holes into perfect
alignment. It feels fantastic to finally have a tank on a wing and
feel like we are coming into the home stretch on the wing construction!
Time : 2.25 hours |
Total Time : 128.00 hours
|
![[ The Frye RV-7 Project ]](images/frye_project_banner.png)