|
|
Vertical Stabilizer Construction
The vertical stabilizer is normally next in line after the horizontal
stabilizer is completed. However, while I wait on parts to arrive from
Van's for some problems I have caused myself on the HS, I'm starting on
the VS early.
It is good, though, that I have learned a lot from my HS antics. As I
start into the VS I have a much higher degree of confidence that I know
what the heck I'm doing. We'll see if that confidence translates into
a well assembled vertical stabilizer!
| Started Vertical Stabilizer |
November 19, 2001 |
My vertical stabilizer work is off to a fantastic start. I match-drilled
the flange to the rear spar, match-drilled the skins to the rear spar,
dimpled the rear spar, and cut the countersinks into the flange. I then
cleaned the flange and took it outside for a first coat of primer. All
in all, a fantastic start!
Time : 3.0 hours |
| Vertical Stabilizer in Jig |
November 22, 2001 |
I got the VS into the jig, the ribs drilled to the rear spar, and the
ribs and forward spar aligned with respect to the skins. It had to take
a break to go eat turkey, though. Happy Thanksgiving!
Time : 2.5 hours |
| Drilled Ribs to Forward Spar |
November 23, 2001 |
This took so long because I drilled the tip rib, put in clecos, and then
put the skins back on to assure myself that the alignment was still
right. It was. I then drew centerlines, measured out rivet spacing, and
drilled the rivet holes through the forward spar. Everything got pulled
apart and deburred. I'm now ready to rivet the skeleton together.
Time : 1.0 hours |
| Assembled VS Skeleton |
November 25, 2001 |
|
I assembled the vertical stabilizer skeleton. Given my construction
sequence (not exactly what is called out in Van's manual) I had to do
all the rivets today. This included riveting the rear spar and the
the ribs to the spars. Next .... drill the skin to the ribs/spars (but
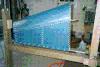
first, I gotta make a "clothespin").
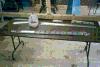
NOTE: I hated the plywood "clothespins" enough that I came
up with what I think is a really superior alternative. I used PVC pipe
with pipe insulation around it as flexible clamps. A single clamp is
made of a pair of pipes, each about 3 feet long, with holes drilled in
the ends such that I could run 1/4 inch threaded rod through the holes.
I put a pipe on each side of the skin, put my rod through the holes, and
tighten the nuts. The flexibility of the pipes causes them to curve to
the shape of the surface and provide fairly even clamping pressure all
around the structure. It worked great!
Time : 5.0 hours |
| Repaired Mis-Alignment |
November 27, 2001 |
|
Upon double-checking my VS I discovered that one rib really would
not have adequate edge distance for the rivet holes. This resulted in
a careful re-work of that area. However, the re-work went well and I
am pleased with the results ... and, furthermore, I feel better about
the alignment.
It is clear that alignment is one of my "problem areas" and I
am going to have to exercise great care in the future. I think I'm learning
the old lesson of "measure twice, cut once" the hard way. Then
again, I suspect many people learn it the hard way. Right??
Time : 2.5 hours |
| Drilled VS Skin |
December 2, 2001 |
|
I drilled the skins to the vertical stab, and the fit is quite good. I
am pleased with the alignment. There are two spots where I would have
been a little happier if I was better centered on the rib .... but it
is clearly good enough. It took so long because I got interrupted at
least two times through the drilling process! Time to debur, dimple,
and rivet.
I also spent some time building clothespins ... and hated the plywood
version. I read in the RVator about using 1/4 inch rod and foam pipe
insulation, but wasn't happy with that either. What I ended up doing
was using 1/2 inch PVC pipe with the foam insulation and it worked
GREAT. The PVC forms to the shape of the surface nicely, has 1/4 inch
threaded rod at the top and bottom so you can tighten them well, and
are easy/cheap to build.
Before I dimple, I needed to build my dimple/back-rivet/bending table.
I had no good large flat surface upon which to put the C-frame dimpler
so I opted to build one. That, too, got finished last night and looks
great. The only thing left is to get some carpet scrap to carpet a few
2x4s to use as padded risers for the skins to slide on.
Time : 1.5 hours |
| No Progress! |
Mid-December, 2001 |
|
The middle of December has seen a long stretch of no progress on the
project. Holiday activities as well as my "Real Life (tm)" have all
conspired to get in the way. Additionally, my decision to build yet
another work table (primarily for dimpling skins, low with carpeted
risers upon which the skins can slide without scratching) kept me
from working on the metal. HOWEVER, after Christmas itself things
are much less hectic (though we are planning for a December 28 party
as I type) and work can start again.
|
| Deburred/Dimpled VS Skins/Skeleton |
December 26, 2001 |
I deburred and dimpled the VS skeleton and the skins. This was the
first use of the "dimpling table" and it made for a super surface
upon which to work on the skins. I'm glad I took the time to build
it. The vertical stab is now ready to rivet.
Time : 3.0 hours |
| Riveted Most of VS Skins |
December 27, 2001 |
|
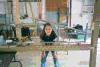
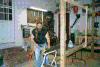
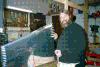
With Theresa's help, the VS skins were riveted to the skeleton. I drove
and she bucked, doing both the "front" and "back" sides
of the VS (with the "back" side being the difficult one requiring
a hand to be stuck up inside the assembly to buck). I also started to
squeeze the rivets around the outside edges and stopped when I ran out
of time. These will be completed tomorrow (party prep duties permitting).
The riveting went great with only one rivet needing to be drilled out, and
only one small "smile" being banged into the skin. I'm very
pleased with the results so far!
Time : 4.5 hours |
| Finished 99.9% of VS Rivets |
January 24-25, 2001 |
|
I have all but six rivets completed on the vertical stab. The six I
have not finished are around one of the hinges, and the two at the
forward tip of the top rib. Those spots are too tight for my squeezer
yoke to work it's way in, and I'm trying to borrow a no-hole thin-nose
yoke from a fellow builder to complete these rivets.
Why has it taken so long to finish this up? Between multiple family
members catching nasty colds (including myself and me having to go to
the west coast for just shy of two weeks, time just vanishes. I'm
now reconciling myself to being a "slooooow builder" and I'm fine
with it. :) Frankly, slow or not, I'm still having fun, and as long
as I don't quit I'll still end up with an airplane in the end!
Time : 3.5 hours |
| Finished Vertical Stabilizer |
February 16, 2001 |
|
My life is insane, as you can tell from this and the immediately previous
log entry. It took me that much time to get the time/tools needed to get
to those last 6 rivets. Partially it was due to the fact that I could
not get my squeezer yoke or any of my bucking bars (including
some I fabricated) into the spot between the skin/spar-flange and the
middle rudder brackets. I finally broke down and got an Avery thin
nose yoke ... and got them installed perfectly in minutes.
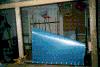
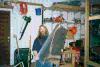
While I claim to be finished, I actually am only finished with the metal
parts. I still need to fiddle with the fiberglass parts, but am leaving
them until all the metal work on the empennage is complete. SO, as far
as I'm concerned right now, I am finished. :)
Time : 0.5 hours |
Total Time : 27.00 hours
|
|
![[ The Frye RV-7 Project ]](images/frye_project_banner.png)